Introduction
ClashManager provides high-level functions for PDS® interference checking. It has been developed to save time and money when clashes in a plant design have to be identified and solved.
ClashManager fully supports SmartPlant® Review version 5.0.1 or later, clashes can be examined directly in SmartPlant Review or MicroStation®. A new tool makes selecting viewing directions much easier while viewing in SmartPlant Review (ClashViewControlCube).
ClashManager is the ideal software to identify large numbers of incorrect clashes and to approve them automatically. This makes it far easier for the user to identify real clashes. Depending on project extent and program configuration the number of collisions which have to be examined can be reduced by the factor 10 to 50.
Filter functions and detailed configuration options allow a preselection of clashes before visual examination takes place. Thus the number of collisions in a project can be reduced to a level which enables the user to examine and handle the remaining real clashes in the viewer.
A tabular representation with a wide range of filter functions considerably facilitates the detection of incorrect clashes. A graphical viewer makes things even easier and offers the chance to intervene immediately.
The software is closely integrated with PDS, which means that the results can be written back to PDS, where they can be used further. Already configured test mechanisms are stored and loaded with the next test procedure of the project. This substantially facilitates the finding of new collisions in the planning process. Likewise it is possible to cancel all changes and to restore the original status for all clashes as well as to delete the list of collisions in PDS.
The envelope builder and interference checker may also be run directly from ClashManager. Parallel batch processing increases speed at file building.
Installation
Setup
Requirements:
Supported operating systems:
Microsoft Windows XP
Microsoft Windows Server 2003
Microsoft Windows Vista
Microsoft Windows 7 or later
PDS Version 6.4 or later
MicroStation SE or later
Microsoft Excel 2000 or later
SmartPlant Review 5.0.1 or later
Uninstall
To uninstall the software, select Control panel from the start menu. Then on
Windows 7-10: in large or small icon view, click Programs and features. If you're using category view, under Programs, click Uninstall a program.
Windows Vista: in classic view, double-click Programs and features. In control panel home view, under Programs, click Uninstall a program.
Windows XP/2000: (Double) click the Add or remove programs icon.
Select the program you want to remove, and click Uninstall/Remove. Alternatively, right-click the program and select Uninstall.
Setup command line (for administrators)
The following command line options are supported by the installer:
/S:<<optional ini file>>
Allow an install to be run in silent mode. As a result, no screens or dialogs will be shown.
This command line option also has an optional INI file that can be passed containing session variable values. For example:
"C:\output\setup.exe" "/S:C:\setupvars.ini"
This will cause the session variables in the INI file to be used for the setup. The INI file should be in the format:
[SetupValues]
%AppFolder%=C:\Program Files\MyProduct
/U:<<XML config file>>
This command line option must be used when calling the uninstall program from the command line. This command also has an optional XML file that can be passed containing session variable values. For example:
"C:\Program Files\MyProduct\uninstall.exe" "/U:C:\Program Files\MyProduct\irunin.xml"
Licence
CAXperts software supports two types of licences:
Site licence (local)
Domain based licences are restricted to machines within a 5 miles (8 kilometres) radius at a specific geographic location (building) for which the licence key file was issued for. There is no limitation regarding the number of users or machines.
CAXperts will need your Current domain name to issue a licence file (.lic).
The licence file has to be stored on a local or network location accessible by the machine running the CAXperts product; a licence server is not required.
The location of the licence file should be defined on every machine with the CAXperts product installed, which can be done
Either by setting the environment variable
CAXPERTS_LICENSE_FILE=C:\Program Files (x86)\CAXperts\Licensing\Or by setting the registry key
> HKEY_CURRENT_USER\Software\FLEXlm License > Manager\CAXPERTS_LICENSE_FILE=C:\Program Files > (x86)\CAXperts\Licensing\
Multiple licence key file locations should be separated by semicolons (“;”).
If the licence key file location is not defined, “C:\Program Files (x86)\CAXperts\Licensing\” is used.
Floating (server) licence
Floating licences require a FlexNET server (lmadmin or lmgrd) accessible by the machine running the CAXperts product. The licence key file is typically located on the FlexNET server machine. The licence key file defines the maximum number of seats which can be used at the same time.
New instances can only be started as long as seats are available and the FlexNET server is accessible.
The location of the licence server must be defined on every machine with the CAXperts product installed, which can be done
Either by setting the environment variable
CAXPERTS_LICENSE_FILE=@YourServerNameOr by setting the registry key
HKEY_CURRENT_USER\Software\FLEXlm License Manager\CAXPERTS_LICENSE_FILE=@YourServerName
Every computer name must be preceded by the @ symbol. Multiple licence server locations should be separated by semicolons (“;”).
YourServerName is the Windows computer name of the machine running lmadmin (FlexNET server). If lmadmin is running on a non-default port, the port number should be defined like this: port@ YourServerName.
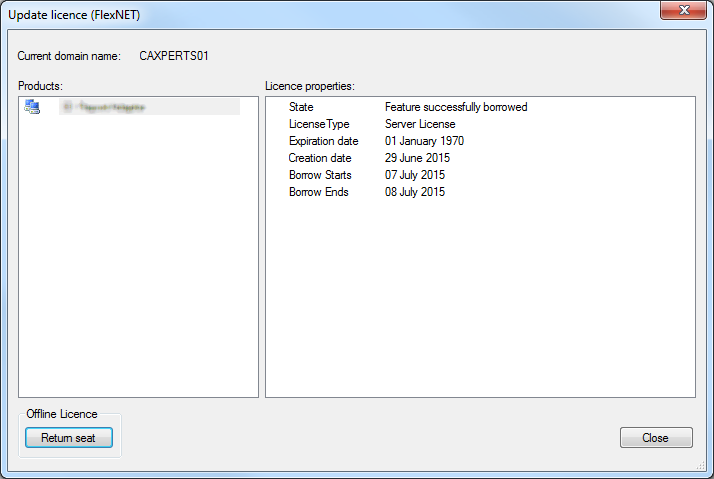
Borrowed licences
Licence seats can be borrowed for a period of time from the server and saved to the local machine. Once the seat has been borrowed the CAXperts application can be used without any connection to the FlexNET server.
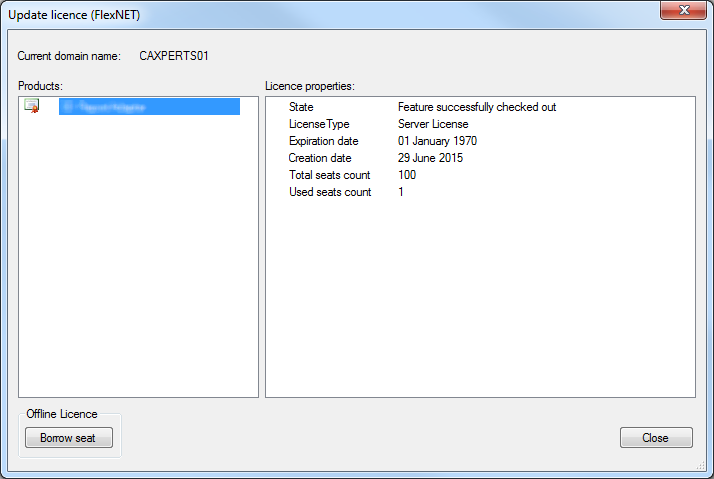
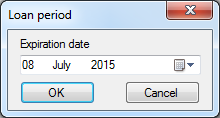
To borrow a licence seat press the Borrow seat button, define the loan period (up to 7 days) and press OK. When the borrowed seat expires it gets automatically returned back to the FlexNET server.
The seat can be returned earlier by pressing the Return borrowed seat button.
Envelope Builder & Interference Checker module
Envelope Builder
The envelope builder receives attributes of the elements from the database and generates envelope files (*.env). Calculation of envelopes is a requirement for collision detection.

Envelope files which are already up-to-date will be ignored during an envelope builder run. All other envelope files will be generated anew. This is especially useful for large projects (see also PDS documentation from Intergraph)
Choose all the models and interference areas in the Envelope Builder & Interference Checker window for which you want to generate envelope files. This is the colour mark-up for the processed items:
Green envelope files are up to date or batch process was successful
Yellow data is being updated at the moment
Red envelope builder process has finished unsuccessfully
The Start button starts the envelope generation and interference checking.
In Intergraph Batch Manager, Disable Job Inflow while Running Job may not be ticked (if it is ticked it would block sending of several jobs at once):
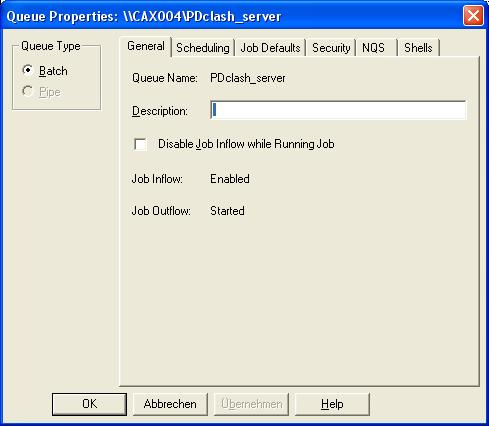
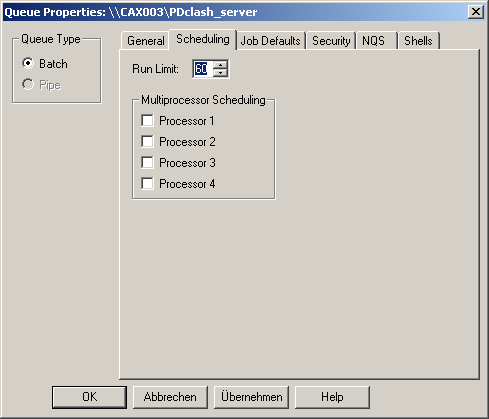
Envelope Builder processes may work “parallel”. Run Limit is a program-defined limit, a legally defined limit is the amount of available licences. We recommend that you set the scheduling properties for the “pdclash_server” queue in Intergraph Batch Manager to a value of up to 60 parallel processes to speed up the envelope building.
Setting of queue properties in Batch Manager/pdclash_server:
Interference Checker
The Interference Checker receives the attributes from the files created by Envelope Builder and calculates the collisions (see also PDS documentation from Intergraph).
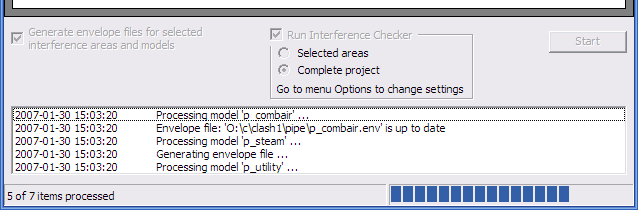
PDS collision detection after envelope generation can be activated by ticking the Run Interference Checker checkbox. Only if both processes are finished successfully for all elements, an effective analysis in ClashManager is possible. The Selected areas switch limits the Interference Checker run on the areas selected. If Complete project is switched on, the check-up of the whole project can be very time-consuming.
Menu bar
File
Select PDS project
Load settings from file
Load/import options from a configuration file.
Save settings to file
Save/export options to a configuration file.
Switch to approval module…
Click on Switch to approval module… to view and approve/unapprove clashes (see chapter Approval module below)
Most recently used projects
Shows the most recently used projects which can be loaded directly (if still available).
Exit
Terminates ClashManager.
View
Event window
Toggles the display of the event window.
Tools
Report status of envelope files for selected models
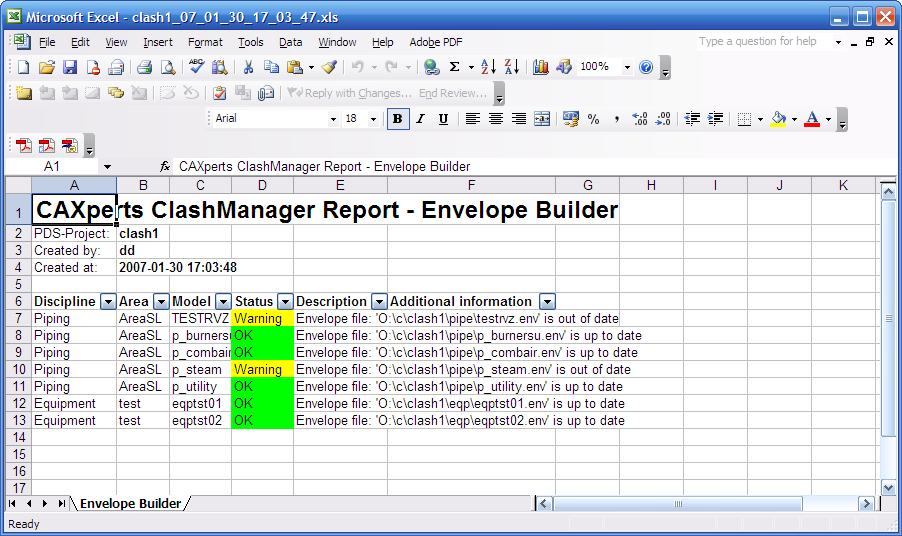
Generates an Excel report for all selected models with envelope file status (green – up to date, yellow – not up to date, red – envelope file is missing).
Clean history of all clashes in PDS
Cleans the Clash History Table (pdtable_135). This speeds up loading and saving of clashes in ClashManager.
Clash Review History Information (pdtable_135): One record per clash is created when it is reviewed after a run. Each time this clash is reviewed using ClashManager, the record in pdtable_135 is updated. If the same clash is present on the next run of Interference Checker, a new record is created in pdtable_135 with the same unique_clash_id. If a clash is never reviewed using ClashManager, no record will be created for this clash.
Delete all clashes from PDS
Deletes all clash entries from PDS database. This is only required in the event of errors in PDS and should usually not be needed by the user.
Options

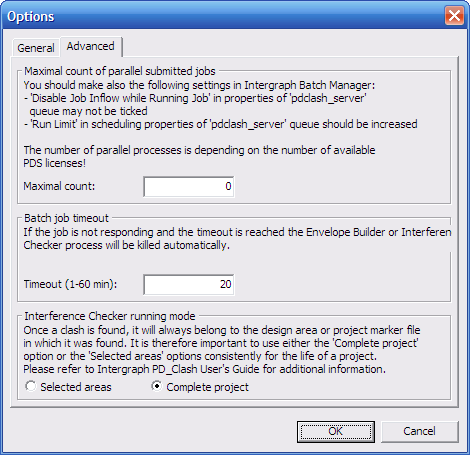
You should also make the following settings in Intergraph Batch Manager:
'Disable Job Inflow while Running Job' in properties of 'pdclash_server' queue may not be ticked
'Run Limit' in scheduling properties of 'pdclash_server' queue should be increased. The number of parallel processes is depending on the number of available PDS licences!
If the job is not responding and the timeout is reached, the Envelope Builder or Interference Checker process will be killed automatically.
Once a clash is found, it will always belong to the design area or project marker file in which it was found. It is therefore important to use either the 'Complete project' option or the 'Selected areas' options consistently for the life of a project.
Please refer to Intergraph PD_Clash User's Guide for additional information.
Privilege manager
The Privileges manager allows you to lock functions for specific users/groups. The assignment of privileges is based on the Windows (domain) users and groups. This means that you do not have to establish a new privileges management system.
Group and user rights are linked by an OR operation: If a group has a certain privilege in ClashManager, every user in this group will have this privilege, even if this privilege is not explicitly stated in the settings for this user.
The access rights are stored in an Access database (ClashManager.mdb). This is located in the proj_file directory. The privileges are thus the same for all the projects in a proj_file.
Access to the Access database should be controlled using the Windows access rights.
Privilege manager is not available when the user works in offline mode of ClashManager (offline mode means that ClashManager has no connection with the PDS database of the project reviewed).
The default setting is “Allow” for every user and group.
Language
You can use the Language menu command to switch between languages at any time. You do not have to restart ClashManager. The most recent language setting is saved automatically.
Language editor
The Language editor allows you to translate the interface into other languages or to modify the existing translation tables.
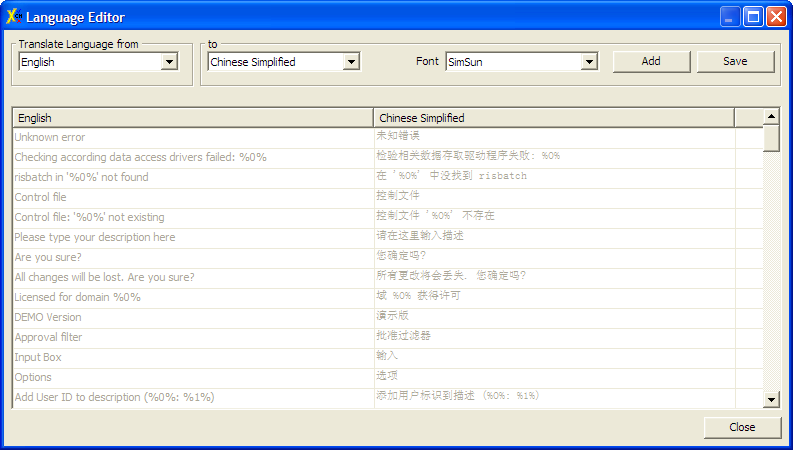
Select source language
Select target language
Select the source and target language. You can then translate the individual items. If the required target language does not exist, you can add it by clicking the "Add" button. Save the completed translation by clicking the Save button.
Help
Contents
Opens the ClashManager online documentation (Contents tab).
Index
Opens the ClashManager online documentation (Index tab).
Search
Opens the ClashManager online documentation (Search tab).
Update licence
See Error! Reference source not found. Error! Reference source not found..
About
About shows version and copyright information about the software.
Command line mode
The ClashManager Envelope Builder & Interference Checker module can also be started from command line. To do so, use the following syntax:
------------------------------------------------------------
CAXperts ClashManager
------------------------------------------------------------
Command line arguments for ClashManager.exe:
/Mode mode - Running modes:
APPROVE - Approval module
CHECK - Envelope Builder and Interference
Checker module
/CMD control_file.cmd - Path to the control file.
If control file is not defined, last
control file will be used.
/Project project_name - PDS-Project name.
If project name is not defined, last
project will be used.
/Config config_file.ini - Configuration file.
If not defined, last configuration file
will be used.
/batch - If defined Envelope Builder and
Interference Checker will be run in
batch mode
Example:
ClashManager.exe /Mode check /CMD
control_file.cmd
/Project project_name /Config config_file.ini /batch
Approval module
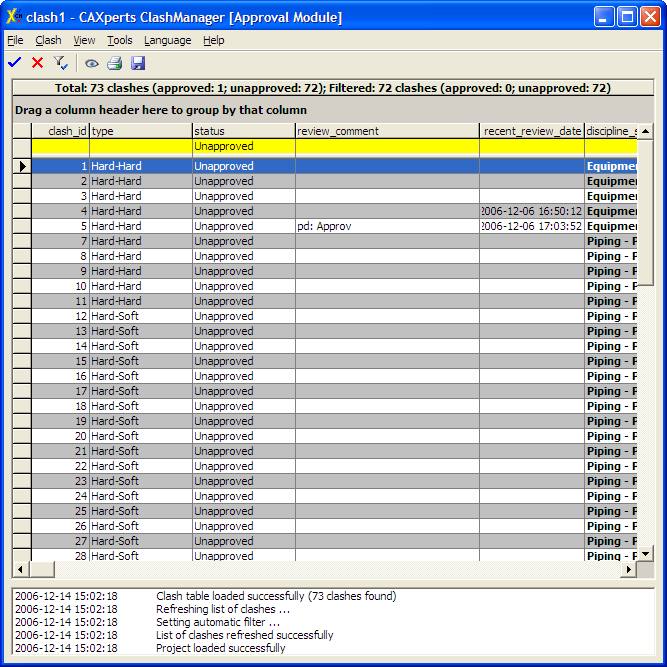
The main window consists of
menu bar
tool bar
list of clashes
log
status bar
There are three modes to load a list of clashes:
from PDS
from an Access database (project schema available)
from an Access database (project schema not available = “offline mode”, also displayed in the window caption)
The main window shows all clashes in the selected PDS project. The Approve and Unapprove buttons on the tool bar assign the corresponding status to the selected clashes.
The columns review_comment and action_discipline may be edited by the user.
Order of columns
Column order may be changed by dragging & dropping column headers (left mouse button).
Sort
If you click on a column header, the list will be sorted depending on this column. Click once more to toggle between ascending and descending sort.
Filter
The yellow row is for entering filter conditions. The conditions may be selected from combo boxes or also be directly entered. All lines that do not match the conditions will be hidden.
Example: selecting Piping in column discipline_a and Piping in column discipline_b shows clashes between piping elements.
Group
You may drag & drop column headers to the dark grey area above to group by these columns. The order may be also changed via drag & drop.
Example: Use models (model_a) as first group and discipline (discipline_a) as second one.
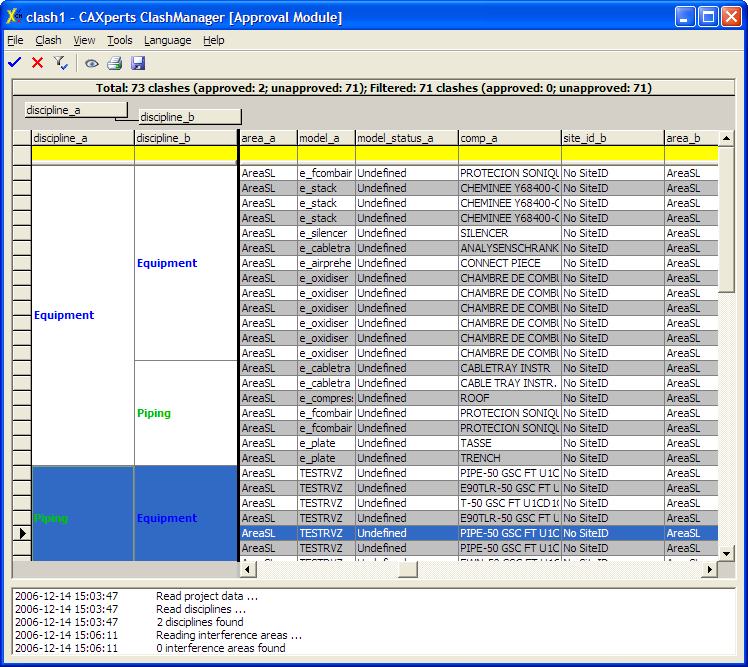
More useful collision filters and sorts:
Filter by status: Unapproved
All approved clashes (usually a large number) will be hidden.Filter by type of clash: If not already set in the approval filter, you could filter by “Hard-Hard”, most “real” collisions are of this type.
Menu bar
File
Load clashes from PDS
Load clashes from file
Loads a database file (*.mdb) which contains a ClashManager list of clashes.
|
|
You can review the clashes in these databases without having PDS installed on your system. |
|
|
If a project schema from an Access database does not exist, the privilege manager will not be available and therefore no user restrictions will apply. |
Load settings from file
Load/import options and approval filter settings from a configuration file.
Save settings to file
Save/export options and approval filter settings to a configuration file.
Save changes
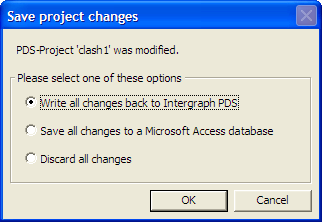
Saves all changes from ClashManager to PDS or Access database. Changes will be only written back to PDS if the recent_review_date is newer as in the project schema.
Switch to Envelope Builder & Interference Checker module
Click on Switch to Envelope Builder & Interference Checker… to generate envelopes of models and detect collisions. The Envelope Builder & Interference Checker will show up (see chapter Envelope Builder & Interference Checker above)
Most recently used projects
Shows the most recently used projects which can be loaded directly (if still available).
Exit
Terminates ClashManager.
Clash
Approve selected clashes
Sets the state of selected clashes to “Approved” (same as “Approve False Clash” in PD_Shell Interference Approval Manager). If necessary, the description dialogue window will show up.
Unapprove selected clashes
Sets the state of selected clashes to “Unapproved”. If necessary, the description dialogue window will show up.
Show selected clash
Shows a clash in MicroStation or SmartPlant Review, the viewer may be selected in this form:
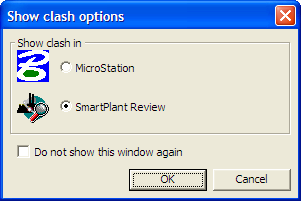
Select a clash and click on Show selected clash to display the clash in MicroStation or SmartPlant Review.
If MicroStation was selected, the display will look like this:
If SmartPlant Review was selected and the automated generation of the SmartPlant Review session is switched on (default) ClashManager will configure the session on-the-fly based on the clashes displayed in its list of clashes.
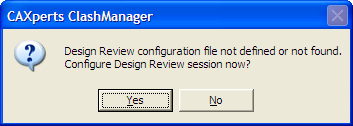
If no SmartPlant Review session configuration file is defined and the automated generation of the SmartPlant Review session is switched off, the Configuration Wizard will show up:
- Click Yes to configure a Design Review
session:
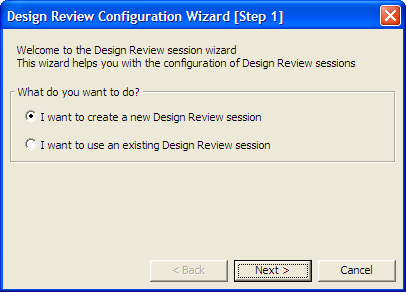
To create a new session, select the first option and click Next (to use an existing session tick the second option, click Next, select the session file an skip the rest of this enumerated list)
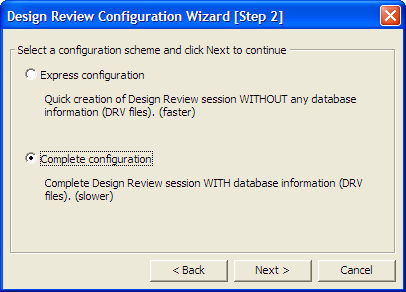
You may choose now between express or complete configuration. Complete configuration means that database information (DRV files) is generated, which may take some time.
Select a SmartPlant Review interface file (using the Browse… button) and click Next:

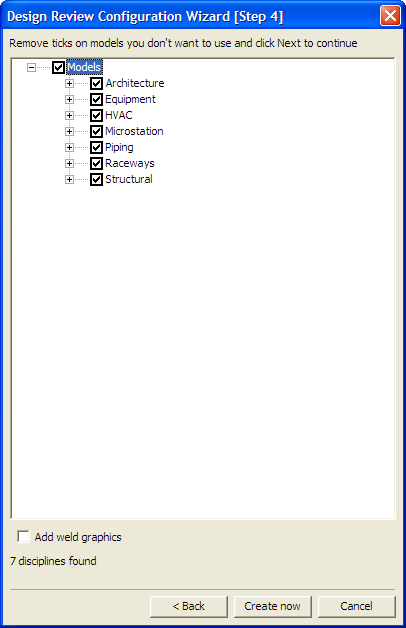
Remove ticks on models you don’t want to use, tick Add weld graphics (available in complete configuration only) if you want to do so and click Next:
ClashManager will now configure the session (this may take some time) and finally display this window:
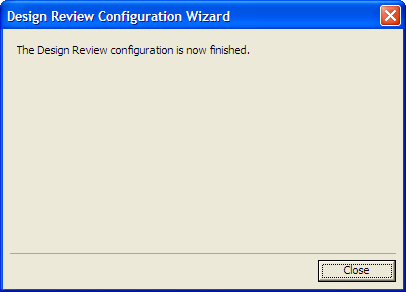
The Design Review session is now ready:
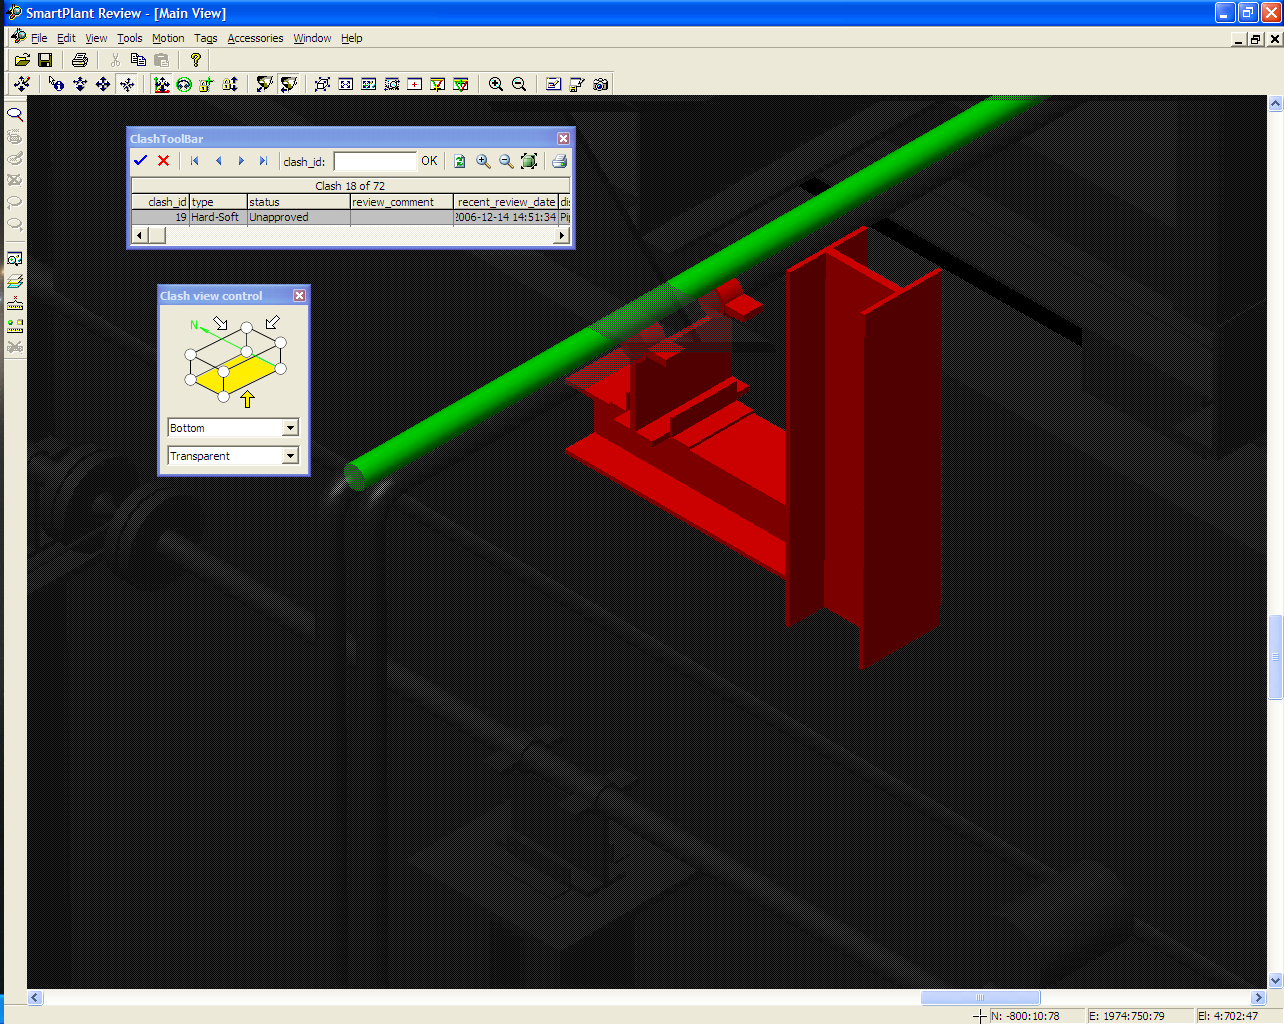
The main window will disappear and a toolbar showing a single row from the list of clashes will appear. The buttons on this toolbar allow you to navigate through the individual clashes from the clash list. Any selected clash will immediately be displayed in MicroStation or SmartPlant Review. The toolbar will always stay on top of all windows.
The toolbar shows these buttons:
 Approve selected
clash
Approve selected
clash Unapprove selected
clash
Unapprove selected
clash Go to first clash
 Go to previous
clash
Go to previous
clash Go to next clash
 Go to last clash
clash_id textbox and OK button: go to the clash ID entered
 Refresh/Reset
display
Refresh/Reset
display Zoom in
 Zoom out
 Show ClashViewControl
(common views), only for SmartPlant Review
Show ClashViewControl
(common views), only for SmartPlant Review Create report
View
Event window
Toggles the display of the event window.
Tools
Report
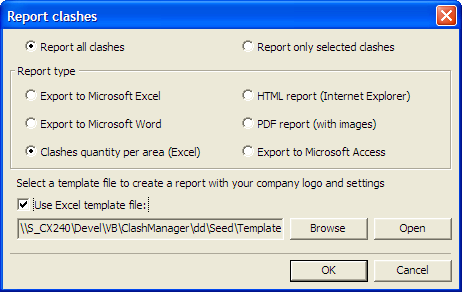
ClashManager supports these file types for reporting clashes:
XLS (Microsoft Excel)
HTML (web browsers)
DOC (Microsoft Word)
PDF (Adobe Acrobat Reader)
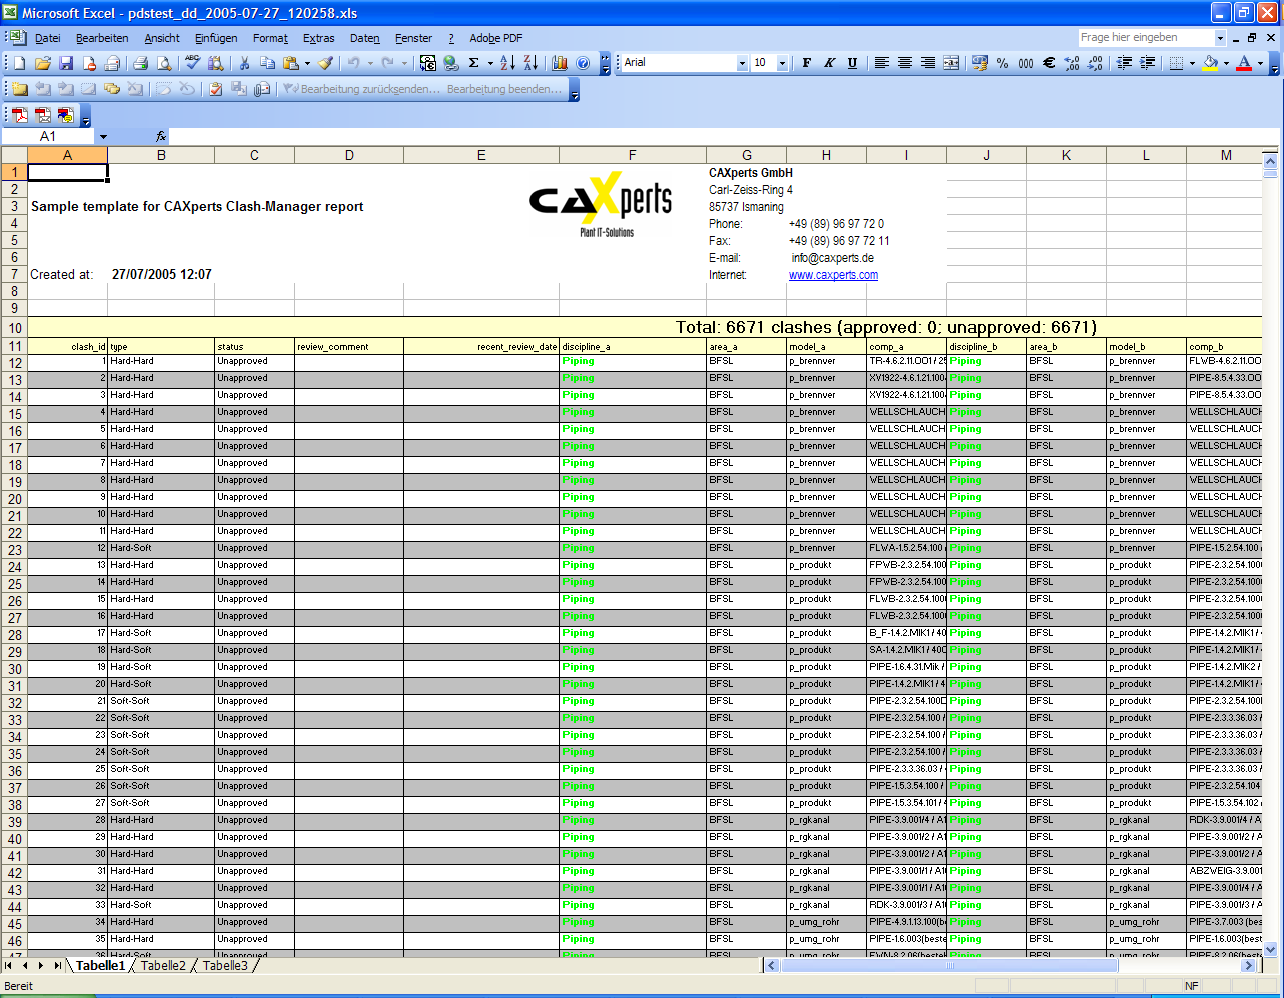
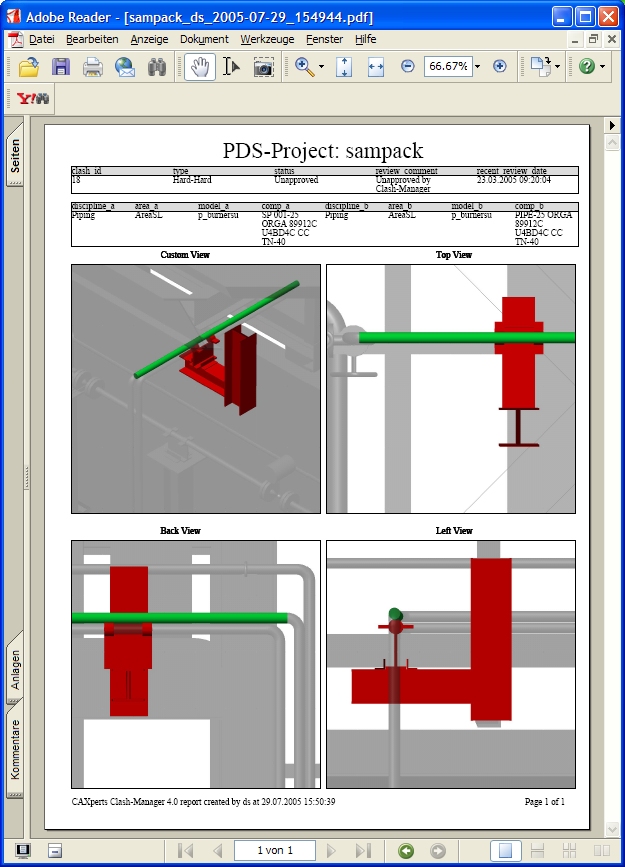
Saves a report with collision data and four views from MicroStation or SmartPlant Review: Isometric View, Top View, Back View and Left ViewClashes quantity per area (Microsoft Excel)
MDB (Microsoft Access)
Use the options at the top of the dialogue to decide if all or only selected elements of the list will appear in the report.
Template
Select a template file (*.xls) to add your company logo or branding to the Excel export (Only available if Use Excel template file is checked and an Excel report type is selected).
To save a report, it is necessary to select a target file name and directory. The report will be displayed by the Windows standard application after its creation. (e.g. usually Adobe Acrobat or Adobe Acrobat Reader for PDF and Microsoft Excel for XLS files)
Approval filter
In the Approval filter window of ClashManager you may choose several filter criteria to set the status of clashes to Approved.
Selection of models
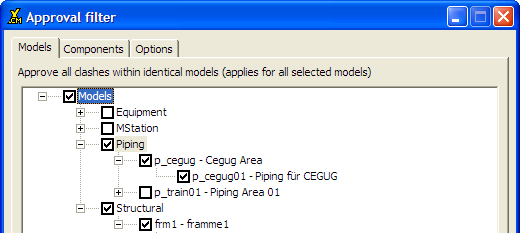
You can select here any models which may get the Approved attribute without further reviewing (e.g. test files, mesh reinforcement).
Selection of components

When you select the Components tab, three further tabs appear with the following component categories:
Piping
Equipment
Structural
Within these three categories, you select the components which are not to be taken into account during clash checking, e.g. pipe clamps, verification equipment (person, truck, auxiliary lines etc.), floor slab etc.
The list on the left shows all available components.
The list on the right is used to enter all the components for which clashes are not to be taken into account.
Use the >> > << < buttons to move the components between the two lists.
You can select components even more quickly by entering the first letters of the components in the filter fields above the lists.
Options
Approve clashes which match the rules defined in Options.
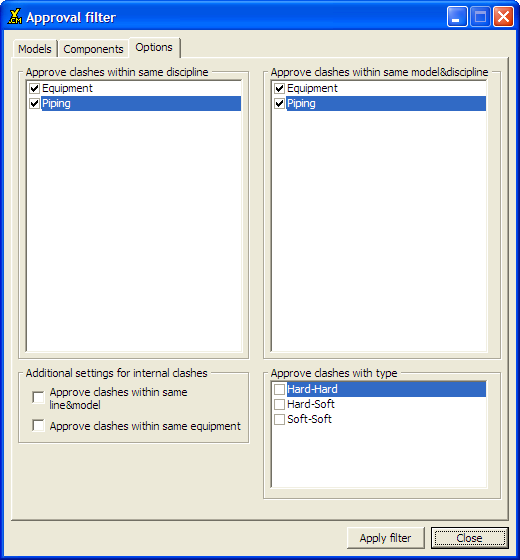
Clashes within same discipline
This approves clashes in which both elements are within the same discipline (e.g. Architecture).
Clashes within same model/discipline
Clashes within a single model will be approved for the selected discipline.
Approve clashes with type
A selection list allows you to exclude certain types of clashes in the filter:
Hard = Component
Soft = Insulation
Construction = Equipment removal space, escape route, ...
Clashes within same line in same model
This option approves clashes where the components lie within the same line (same line number label, the line clashes with itself).
Clashes within same equipment
This option approves clashes where the components lie within the same equipment element (the equipment element clashes with itself).
Privilege manager
The Privileges Manager allows you to lock functions for specific users/groups. The assignment of privileges is based on the Windows (domain) users and groups. This means that you do not have to establish a new privileges management system.
Group and user rights are linked by an OR operation: If a group has a certain privilege in ClashManager, every user in this group will have this privilege, even if this privilege is not explicitly stated in the settings for this user.
The access rights are stored in an Access database (ClashManager.mdb). This is located in the proj_file directory. The privileges are thus the same for all the projects in a proj_file.
Access to the Access database should be controlled using the Windows access rights.
The default setting is “Allow” for every user and group.
Options
General
On the General tab you may decide if ClashManager should show the clashes in Bentley MicroStation or Intergraph SmartPlant Review. It is also possible to decide every time individually (to do so, tick the checkbox at the bottom of the tab).
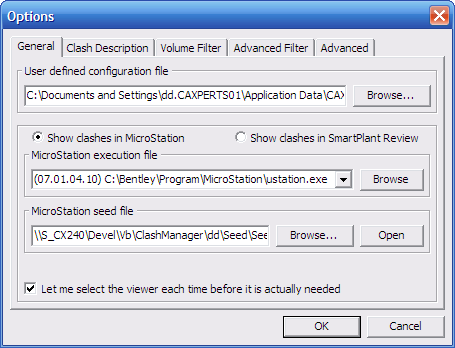
If you want to use MicroStation, select the ustation.exe of your MicroStation installation in the combo box and a seed file (DGN format) in the textbox in the middle of the tab (you may use the Browse buttons to select the files). The seed file will be used as a template for the display of the clashes in MicroStation.
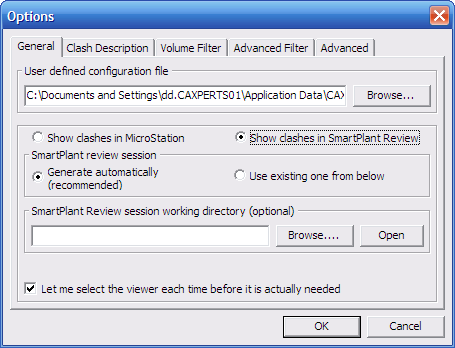
Automated generation of the SmartPlant Review session is switched on by default: ClashManager will configure the session on-the-fly based on the clashes displayed in its list of clashes.
This happens, if the SmartPlant Review session working directory is defined:
ClashManager will check if the models in this directory are up-to-date. Up-to-date models will be immediately used in the SmartPlant Review session, out-of-date model files will be copied from the original model file location.
All files from this working directory will also be reused at the next start of ClashManager.
If the working directory is not defined all SmartPlant Review session files will be stored in the TEMP directory and will be deleted on program exit.
The user may also choose to use an existing SmartPlant Review session which will be displayed independently of clashes shown in the list of clashes.
Clash description

The Clash description tab offers you textboxes to key in user specific comments for approve/unapprove actions.
Example for user-specific comments:
Approved by constructor A
or
Unapproved by project manager B
If the checkbox Let me input the description is checked, a dialogue will show up every time the status of an item has changed, otherwise the default text will be used.
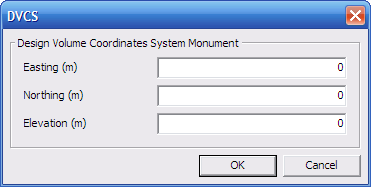
Volume filter
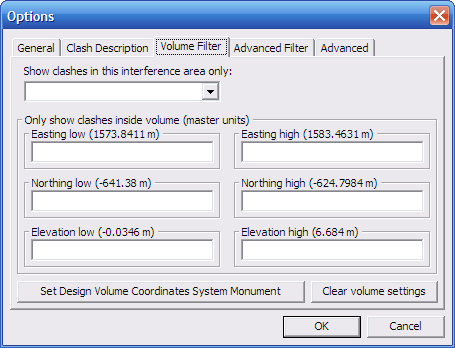
The volume filter defines the volume in which clashes are shown: You may select an interference area in the combo box or enter the corner points of the filter volume.
Press Set Design Volume Coordinates System Monument to edit these settings:
Advanced filter
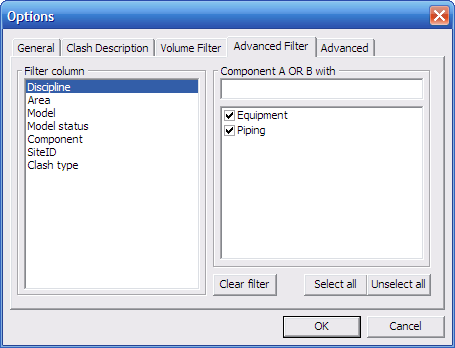
This filter may be set to display only clashes within a model, discipline, area or SiteID (or a list of them). The clash will be shown if one of its components fulfils the condition.
Advanced
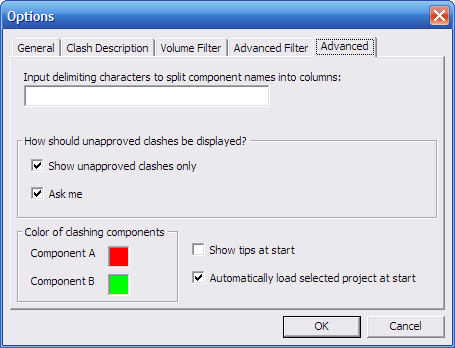
Component name split
This text field may contain one or more characters which will split the component’s name in the list of clashes (the separator characters must be valid; otherwise the separator will be ignored).
Example:
Component: PIPE-100 GSC FT U1CD1Q-0
Separator: -Appearance in Clash Viewer list:
Column comp_a_0: PIPE
Column comp_a_1: 100 GSC FT U1CD1Q
Column comp_a_2: 0
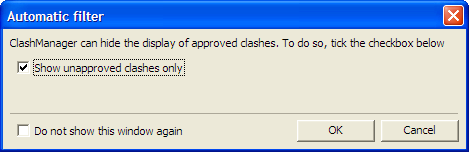
Display of unapproved clashes
You may choose to show unapproved clashes only by ticking the checkbox. If you tick Ask me, ClashManager will ask you on certain occasions (program start etc.) how it should display unapproved clashes:
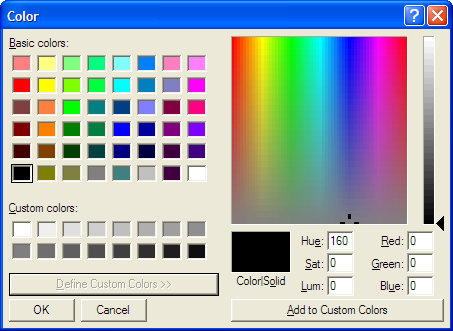
Colours
Clashes are marked up by colours (in PDF reports and SmartPlant Review sessions) which you can choose by clicking on the coloured areas next to the Component A/Component B labels. A Windows standard colour selection dialogue will show up:
Start-up options
You may select here, if ClashManager should show a tip of the day window on start-up and if the last project should be automatically reloaded.
Language
You can use the Language menu command to switch between languages at any time. You do not have to restart ClashManager. The most recent language setting is saved automatically.
Language editor
The Language editor allows you to translate the interface into other languages or to modify the existing translation tables.
Select source language
Select target language
Select the source and target language. You can then translate the individual items. If the required target language does not exist, you can add it by clicking the "Add" button. Save the completed translation by clicking the Save button.
Help
Contents
Opens the ClashManager online documentation (Contents tab).
Index
Opens the ClashManager online documentation (Index tab).
Search
Opens the ClashManager online documentation (Search tab).
Update Licence
See Error! Reference source not found. Error! Reference source not found..
About
About shows version and copyright information about the software.
Tool bar
The toolbar contains select commands from the menu bar:
- Approve selected
clash(es)
- Unapprove selected
clash(es)
 Approval filter
 Show selected clash
- Create report
 Save changes
Log files
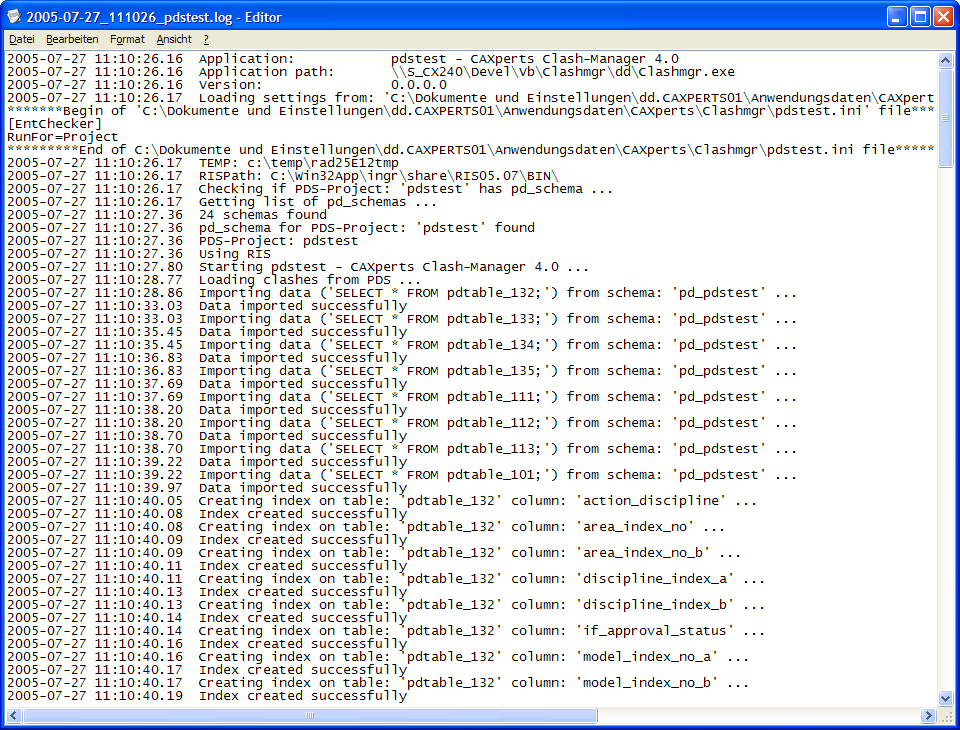
ClashManager creates a log file (*.log) in a sub-folder of the temporary folder of Windows® (usually c:\temp\ClashManager) for debugging reasons. This log file records date and time of every action carried out during a ClashManager session. It may be accessed by clicking on the log of the ClashManager main form.
Naming of the log files follows this rule:
YYYY-MM-DD_hhmmss_projectname.log
Example:
2005-07-27_110408_pdstest.log
So the list of log files can be easily sorted and analysed. To open a log file in Windows Editor click on the event log textbox in the ClashManager main window.