Custom Attributes
|
|
“Open custom attributes panel” Custom attributes provide a way to add new attributes to a model without having to rebuild the model with the UPV Builder. |
If a valid attributes.xlsx file is present in UniversalPlantViewer’s data folder (e.g., C:\UPV\Model\Demoplant\Data\attributes.xlsx), UPV will showcase all available attributes, including your custom ones, in the “Custom attributes” menu located on the right side of the screen.
When using the “Ctrl” key to select multiple objects, their common attributes are displayed directly.
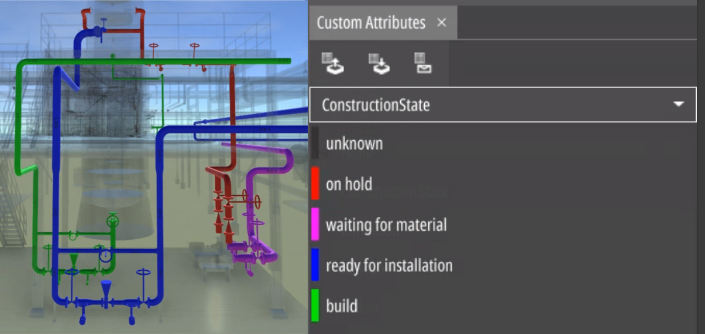
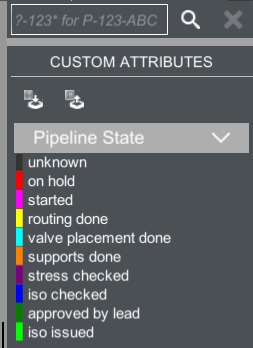
Custom Attributes Panel
In the “Attributes” tab, “Custom attributes” stand out due to their distinct color. In the standard view, they appear in yellow and, unlike regular attributes, are editable. The editing process may differ based on the type of custom attributes.
When you select a custom attribute in the “Custom Attributes panel”, not only are the objects colored accordingly, but the custom attribute in the “Attributes” tab also turns red instead of yellow.
This can also be achieved by double-clicking a custom attribute. While the coloring via the “Custom Attributes panel” affects all objects, by double-clicking the custom attribute the objects are only colored according to the Codelist color scheme when clicked on in the viewport.
When you edit Freetext custom attributes, you just type in your desired custom value, similar to how you did it with the Comment attribute on the previous page. As for Codelist attributes, you’ll find a drop-down menu where you can select from various options.

Furthermore, codelist-based custom attributes not only show the selected value but also display the color assigned to the corresponding custom attribute in the codelist color scheme.
Custom Attribute Tool Bar
|
|
“Export all changes” This option saves all the data entered into custom attributes in a single .xlsx file with the respective information of the item they have been linked to. |
|---|---|
|
|
“Import all changes” This loads previously saved custom attribute values from an .xlsx file back into the custom attributes. |
|
|
“Send email” Custom attribute changes are logged during the session. Clicking the button generates and copies changes to the clipboard, then opens an email in your default client. Default recipient and subject are configured in the ‘Meta’ tab of IntelliPIDattributes.xlsx. For details, see Custom settings section. |
|
|
“Show only active” Unused custom attributes won’t appear in the list of values or legend for the currently displayed P&ID. |
|
|
“Place legend” This function displays a legend on the P&ID, showing the corresponding color keys for custom attributes. The legend can be relocated by dragging it to any position on the P&ID. For details on custom attribute code lists and the legend, refer to the description below. |
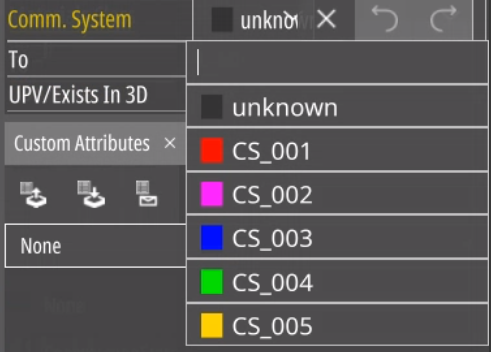
Custom Attribute Drop-Down
The drop-down menu allows selection from custom attributes with code list definitions. ‘None’ is the default selection, with standard coloring for the P&ID. If a custom attribute with a code list is chosen, objects on the P&ID will be colored based on their custom attribute value, and the legend will appear below.
Custom Attributes File
To utilize “Custom Attributes,” you must create an Excel file containing the required information. This file, named attributes.xlsx, should be placed in the model’s data folder. The file consists of various tabs, as outlined in the following sections.
Definition Tab
| Name | Description |
|---|---|
| Id | Identification for custom attributes. |
| Name | The name of the custom attribute as displayed in the UPV attributes. |
| SourceAttribute | If the custom attribute is part of an existing attribute, declare the name of the existing attribute here. |
| Filter | See chapter Filter |
| DataType | See chapter DataType |
| DefaultValue | The default value used when the user hasn’t made a selection yet. |
| Parameter1-3 | Parameters differ based on the DataType. See the following chapters for specific details. |
DataType
| Name | Description | Parameter1 | Parameter2 | Parameter3 |
|---|---|---|---|---|
| Calculation | Simple predefined calculations. See chapter Calculations | Calculation identifier | - | - |
| CodeList | A dropdown with differently colored options. See chapter CodeList | Codelist identifier | Linked Codelist attribute | - |
| FreeText | Any text | Limit of Characters in the textbox; 0 for no limit | - | - |
| Numeric | Any number | Min value | Max value | Number of floating points |
Filter
The “Filter” tab in the configuration file contains conditions used to group items by specific parameters. Instead of the filter name, the filter condition itself can be written in the “Definition” tab, as long as it’s in a single cell.
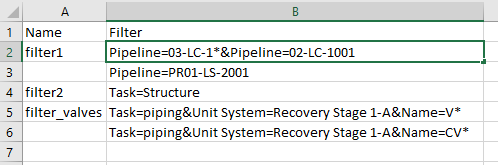
Example
“filter1” could not be written in the “Definition” tab, while filter 2 would work.
“filter1” attribute will be applied to all objects meeting the following criteria: where the pipeline attribute starts with “03-LC-1”, is exactly “02-LC-1001”, or is exactly “Pipeline=PR01-LS-2001”.
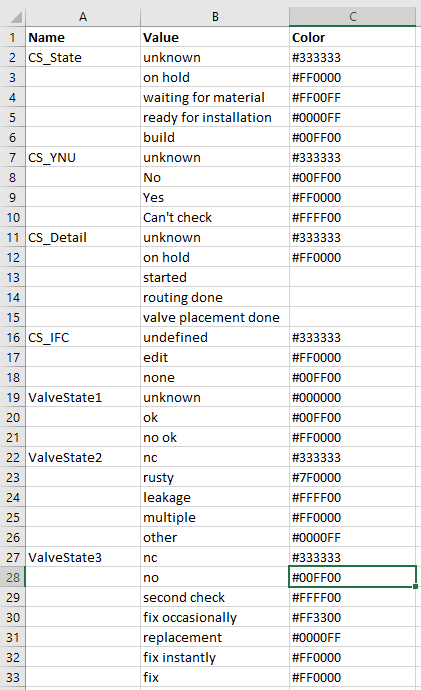
CodeList
|
The CodeList tab provides details about the DataType CodeList used in the Definition Tab. CodeLists generate drop-down menus in UPV for the custom attribute. |
|
The Name as shown in UPV. Every row following that has no name belongs to the attribute-name specified last. Eg, after CS_State, all values and Colors from B2 to C6 are part of the CS_State attribute. |
Value: The text for the contents of the custom attribute drop-down in UPV.
Color: The color of the square next to the values of the attribute drop-down. When filtering for attributes, this color will also be the color of the corresponding 3D object in the main view.
Calculation
Calculations are predefined functions which are executed for each element.
| Name | Description |
|---|---|
| TOS | TOS (Top Of Steel) gives back the elevation in meters on the highest point of the element. |
| BOS | BOS (Bottom Of Steel) gives back the elevation in meters on the lowest point of the element. |
| ElementColor | Gives back the elements current primary color as hexcode. |
| OriginalColor | Gives back the elements original primary color as hexcode. |
| VisibleColor | Gives back the elements color as hexcode also considering temporary UPV features (f.e. CodeList Color, highlighting, Center of Gravity, …). |
| StaticText | Will display the value from “DefaultValue”. |
| Bounds | Gives back the bound coordinates. Uses a format string as Parameter1 inserting the values f.e. default is: (%lowX%, %lowY%, %lowZ%) (%centerX%, %centerY%, %centerZ%) (%highX%, %highY%, %highZ%) |
Meta
The “Meta” worksheet tab is used for general information
| Key | Value |
|---|---|
| Email_To | Preset value used as receiver when sending a changeset email |
| Email_Subject | Preset value used as subject when sending a changeset email |
| Workcard_Header | Overwrites the workcards text header |
| WorkcardMail_To | Like email To but for workcard |
| WorkcardMail_Subject | Workcard email subject (can use special keywords) |
| WorkcardMail_Body | Prefix for work-card email body (can use special keywords) |
| Placeholder | Description |
|---|---|
| %workcard% | The currently selected work-cards “Work”-value |
| %devicename% | The users device identifier |
| %date% | Current date |
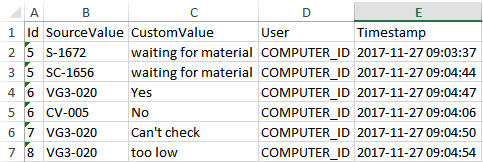
Import / Export All Changes
|
|
You can export changes made to custom attributes to an Excel file or import changes made. |
The Excel file will contain the following information:
Changes made to “Custom attributes” in the current session will be pasted to the clipboard and the email software will be started.