Installation
Setup
Requirements:
Supported operating systems:
Microsoft Windows XP
Microsoft Windows Server 2003
Microsoft Windows Vista
Microsoft Windows 7 or later
PDS Version > 6.4
Microsoft Office 2000, Microsoft Office XP or Microsoft Office 2003
Microstation SE or later
Administrator rights are required on each computer to install CAXperts PDS2SDNF. “Run as” is not supported.
Uninstall
To uninstall the software, select Control panel from the start menu. Then on
Windows 7: in large or small icon view, click Programs and features. If you're using category view, under Programs, click Uninstall a program.
Windows Vista: in classic view, double-click Programs and features. In control panel home view, under Programs, click Uninstall a program.
Windows XP/2000: (Double) click the Add or remove programs icon.
Select the program you want to remove, and click Uninstall/Remove. Alternatively, right-click the program and select Uninstall.
Setup command line (for administrators)
The following command line options are supported by the installer:
/S:<<optional ini file>>
Allow an install to be run in silent mode. As a result, no screens or dialogs will be shown.
This command line option also has an optional INI file that can be passed containing session variable values. For example:
"C:\output\setup.exe" "/S:C:\setupvars.ini"
This will cause the session variables in the INI file to be used for the setup. The INI file should be in the format:
[SetupValues]
%AppFolder%=C:\Program Files\MyProduct
/U:<<XML config file>>
This command line option must be used when calling the uninstall program from the command line. This command also has an optional XML file that can be passed containing session variable values. For example:
"C:\Program Files\MyProduct\uninstall.exe" "/U:C:\Program Files\MyProduct\irunin.xml"
Configuration
Before working with PDS2SDNF the Pds2Sdnf.ini must be configured.
There are some General Conventions
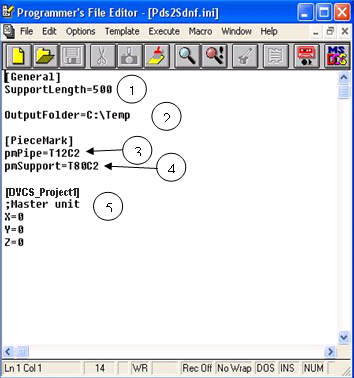
The supports are represented by three crossed profiles after the > import of the SDNF file into TEKLA Structures. The Support Length > = 500 is the length of one profile in MicroStation subunits > [mm].
This is the Output folder. When the export process is started the > user are prompted for the Output Directory.
Any attribute from PDTable 12 can be written into the PieceMark > field in SDNF. This PieceMark value is imported as Attribute > “Name” into TEKLA Structures.
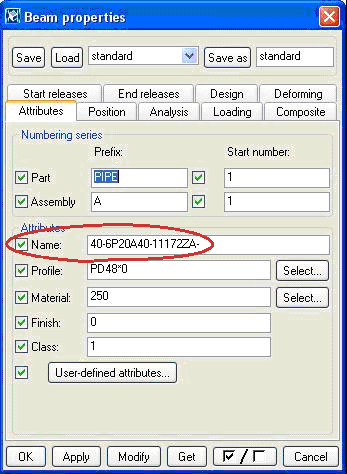
> Every imported component from PDS Piping shows now the value from > PDTable 12 Column 2 (T12C2, line_number_label) as shown in the > figure below:
>
> In the properties dialog it is represented by the Name attribute.
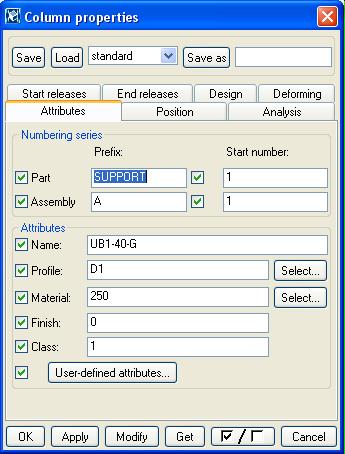
For Pipe Support every attribute from PDTable 80 can be written into > the PieceMark field in SDNF. This PieceMark value is imported as > Attribute “Name” into TEKLA Structures.
> Every imported support from PDS Piping shows now the value from > PDTable 80 Column 2 (T80C2, pipe_support_no) as shown in the > figure below:
>
>
> In the properties dialog it will be represented by the Name > attribute:
>
If a PDS Project has a Plant Coordinate System with a Plant Monument > point not at 0,0,0 this is recognized by the DVCS value of the > corresponding project DVCS_Project1.
> Coordinates in the Plant Coordinate System (PCS) are in relation > to the plant monument. For example, if the plant monument was > modified from its default setting of 0,0,0 to be E. 30000m, N. > 25000m and EL. 1000m, then a point 1000m east and 1000m north away > from the plant monument would be at E. 31000m, N. 26000m and EL. > 1000m in the Plant Coordinate System.
> In this case the entry in the PDS2SDNF.ini file is:
> [DVCS_Project1]
> ;Master unit
> X=30000
> Y=25000
> Z=1000
Working with PDS2SDNF
When you start PDS2SDNF, the main window shows up:
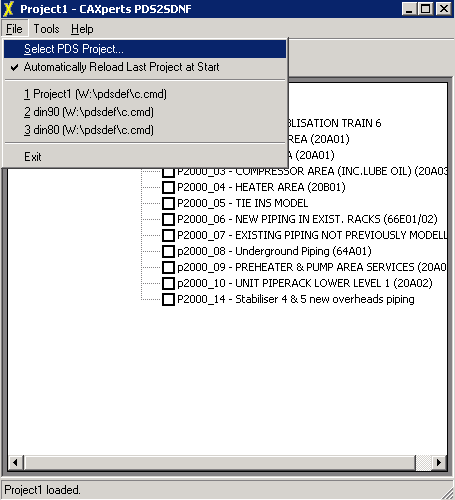
Initially a PDS project has to be selected.
When the option “Automatically Reload Last Project at Start” under menu File is ticked on your last opened PDS project is started automatically.
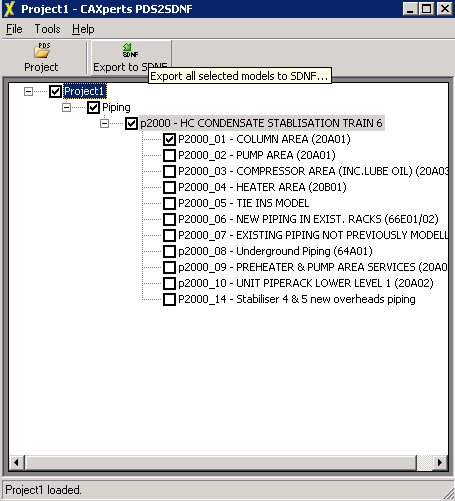
The next step is to selected the models from the tree view which are to be exported:

These selected models can be exported to SDNF. The user is prompted for an Output directory:
For each PDS model a separate .dat file with the according PDS model name is generated in the output directory. All the PDS primitives are exported incl. their PDS-Database Values into SDNF.
These files can be imported directly into CAD Programs which can read SDNF.