Files Tab
| Button | Description |
|---|---|
|
|
Adds a new folder. |
|
|
Deletes the currently selected tree-object. |
|
|
Copy a selected tree-object. |
|
|
Undoes the last change to the tree. |
|
|
Redoes the last undone change to the tree. |
|
|
Saves the currently selected tree object as a .upvtree file. |
|
|
Opens a .upvtree file. |
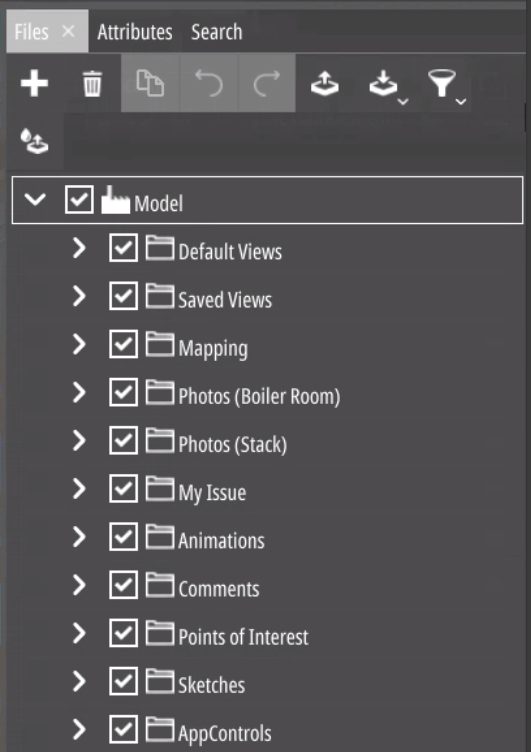
The “Files” tab shows a tree hierarchy of the models
work items. You can create additional UPVfiles by clicking on the
drop-down on the left side of the menu underneath the
“Attributes” and “Files” tab.
You
may add the UPVfiles shown in the table below to the tree.
Tree Items
| Symbol | Description |
|---|---|
|
|
“Add” drop-down - Adds a folder object to the model root. Subfolders are currently not supported. In folders, all other types of files can be stored and grouped. For multiple files to one P&ID, for example, you can create a folder that contains all relevant files for that P&ID. |
|
|
“2D to 3D projection” |
|
|
“Animation” |
|
|
“AppControl” |
|
|
“Comment” - The commenting object contains one comment per node. Comments can be attached to any document elements, original or sketch. Commenting objects are always dependencies of the document object. For more details, see the chapter: Comment. |
|
|
“Drawing” |
|
|
“Markup” - The markup file enables you to do markups on your documents, including graphical objects. |
|
|
“Measurement” |
|
|
“Package” |
|
|
“Photo” |
|
|
“P&ID sketch” - The sketch file enables you to add sketches to your P&ID, including you custom P&ID symbols. |
|
|
“Point of interest” |
|
|
“Report” |
|
|
Screenshot |
|
|
Sketch |
|
|
Spraying |
|
|
View of the current camera position |
Quick Action Buttons
Momentary Quick Action Buttons
|
|
Edit, starts an editing process in a modal way. |
|
|
View, e.g. moves the camera to a saved position |
|
|
Select |
Quick Action Toggles
|
|
Show/Hide item |
|
|
Lock/unlock item for modification |
File Management
|
|
The file management menu includes most options for saving and loading except packages and views that can be found in their respective menus. |
|
|
Save and load configurations to a .UPV file. A configuration includes the current settings, clipping, colourisation, view, tags, etc. |
|
|
Load a colour file. You can choose between local and online colour files. |
|
|
Load a link file. You can replace existing links or append the existing links with new ones. |
|
|
Create a link and copy it to your clipboard. Example: upvapi://http://demo.universalplantviewer.com/demoPlant/4/0/?uid=0003a998-0000-0000-681a-a3ff06552004 |
|
|
Create a report. |
|
|
Save objects to disk in OBJ format. |
|
|
Generate a double-sided ISO PDF. This will create both an isometric view and an orthographic drawing for better visualisation. |
|
|
Open the manual. |
Check the file names you have entered before saving. There will be no warning if the file name already exists!
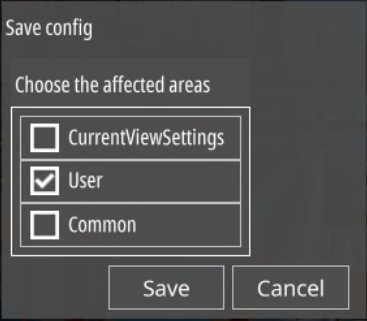
Save Configuration File
|
|
Choose which information to save: |
Load Configuration File
|
|
UniversalPlantViewer automatically loads a default configuration file. You can save a custom configuration file as defaultConfig.upv in the same location as the UniversalPlantViewer.exe. |
You can also define the path to the settings file in the URI: file://C:\Path\To\UPV_Web.html?settings=c:\MySettings\Config.upv.
Save and Load Objects
|
|
You can save selected objects as .obj file to edit them with a modelling tool or to duplicate them in your model. Click on “Import avatar from disk” in the additional objects panel and then click on a location in your model to add it. After that you can move and rotate the object. |
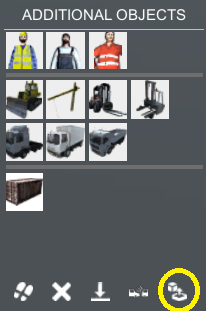
| These objects are treated as additional objects if you load them in the 3D view. You can delete them in the additional objects panel. If you load them in sketch mode they are treated like objects from the catalogue. | ||
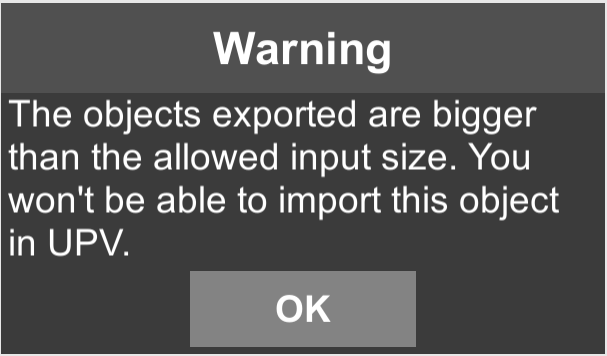
|
If you save objects as OBJ files there is a size limit matching the maximum input size UniversalPlantViewer can handle. If you export more than 20 objects you’ll get the following warning message: | |
|
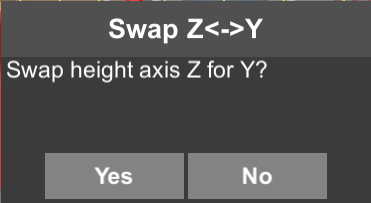
Before saving you can choose to swap the height axis (Z) for the breadth (Y). | |