Introduction
Since PDS 6.4, Intergraph supplies the Material Data Publisher with PDS. This makes it possible to write almost all data (from database, libraries and design files) available in PDS to a single database for the first time. This opens up entirely new opportunities for evaluation.
The MDP-Manager, however, really makes this data usable. It offers the following benefits:
Extremely fast extraction to Access
No costly and error-prone configuration of ODBC
Important: Quality checking of data
Easy to operate
Data is indexed in a practice-oriented way (significantly faster queries)
Date and time are converted to a readable format
Nominal widths in inches are decoded
Files can be deleted from the MTO schema
It is possible to check that entries for all fields comply with company-specific input rules
Comprehensive training program with several videos. It is thus possible for anyone to use the data, even if they have no knowledge of PDS
Data can be sent to customers, suppliers and sites by email. The recipients can then create evaluations quickly and easily
Main window
PDS-Project
Once the software has been started, the project-specific INI file must be selected.
MDP-Manager Config-File
The INI file contains all the necessary project-specific settings, e.g. name of the project.
The config file can be choose either by file open dialog with Browse-button or by drag&drop.

By pressing the Open-button you can open the file in the default text editor.
Oracle User and Password
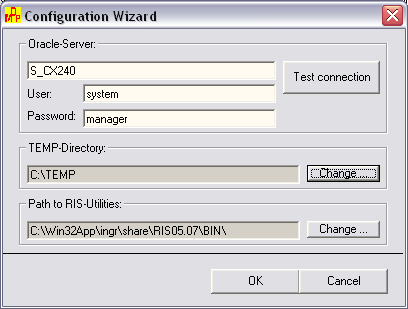
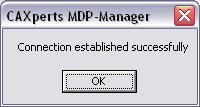
To get access to Oracle database and store these information, use OracleUsername and password field in configuration file in MDP-Manager. Create this file by running the configuration wizard in ‘Custom’-mode in ‘Advanced ’Settings’ to edit project file. Test settings by press the ‘Test connection’ button. Due to this it is possible to create a distinct server-, user- and password definition and save it 128Bit decryption procedure in an project.ini file. This assures a high security and supports the largest poosible flexibility in the database- and projectadministration. Create a distinct database access definition for each project. See also item 6.2.11.
Project-INI-Configuration
[Oracle]
User=system
Password=edacmncmlpcclp
Servername entry[MDPmgr]
OracleServer=S_CX240
Specify the hostname from the database server.
If there is no entry [Oracle] the projekt.ini, this entry will searched in the mdpmgr.ini, copy it from a project.ini, because it can not create by the configuration wizard. After that, this is the default value for all projects without [Oracle] entry. If there are no entries in both files (projekt.ini and mdpmgr.ini), the project specific entry [SchemasPass] will be used.
Project structure
The project structure is then displayed in the right hand tree hierarchy. This allows you to select disciplines, design areas and models to be extracted.
The red marked model items are missing in mto-scheme, but are existing in pd-scheme. Those can’t transfer to Access-Database unconditionally.
To extract the missing models from pd-scheme, you have to activate the checkbox and run the MDP-Manager with inactive option “Only transfer to Access”.
Access Database

Specify the Access file to which the data is to be extracted. You can either select an existing file or create a new one.
If in the MDP-Manager Config file define is set to “Access Seed Database”, it will be used only by “Create new database”.
Publishing Options
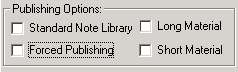
The "Publishing Options" section specifies whether or not the libraries are to be extracted as well. Options are only then active, if the switch “Only transfer to Access” is deactivated.
Forced Publishing
The "Forced Publishing" check box specifies whether data is to be
completely deleted from the database (MTO schema) and then extracted
entirely from scratch ( ) or only changes are to be
taken into account (
) or only changes are to be
taken into account ( ).
).
If the Forced option is checked (
Transfer Options
Only transfer to Access

If this option is checked, only the data from the existing MTO schema is transferred to the Access file, where it is checked and indexed etc.
If the option is not checked, the Intergraph MDP is carried out first.
Transfer only selected models
If the switch “Transfer only selected models” is checked, only selected models from mto-scheme will be load into database, otherwise all data from-mto-scheme will load.
Load all tables from
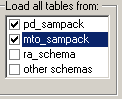
All tables from selected scheme items in the project will be loaded. “other schemas” – all other schemes of the project, except listed and dd-schemes.
The button “Extended select Table” selects tables, which will be ignored and not loaded.
Extended select tables
By pressing the “Extended select tables” you are able to select single tables from all schemes of the project, except dd-schema.
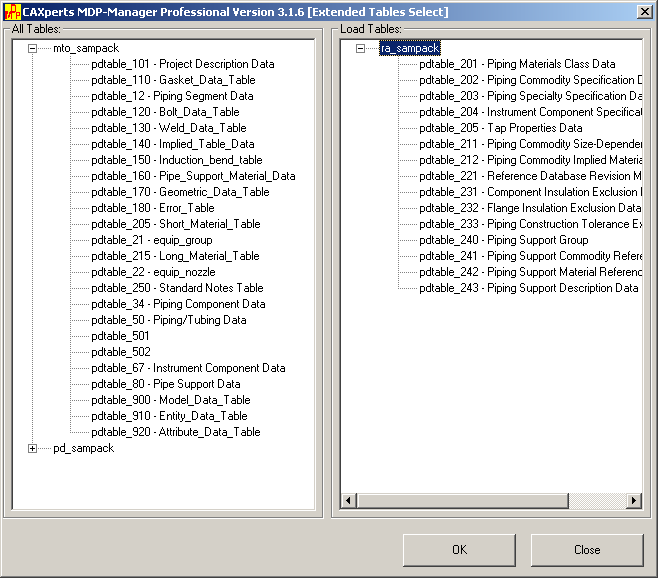
On the left side are all available tables listed. In the right part of the window are those listed, which will be load.
By using Drag&Drop you can select the whole scheme or a single table, easy from left to right.
To save all changes and close this window, press “OK”.
To close this window and throw all changes away, press “Close”.
Quality Scripts
Check Pipeline-ID & EQP Name

This option allows pipelines and equipment to be located whose name (LineID) does not comply to the rules that have been set.
Rules:
n (lowercase) – any digit
c (lowercase) – any alphabetic character
other character (A, X, -, _, .) to be used as written
Examples:
nnn-ABC-ccc
| Correct | Incorrect |
|---|---|
| 123-ABC-RKL | 12-ABC-RKL |
| 007-ABC-NIX | 007-ABX-NIX |
| 471-ABC-XXX | 471-ABC-XX |
These pipelines are not deleted automatically, but are listed in an access table (bad_lines). These pipelines can be deleted at a later stage with the "Tools Bad Lines" option.
In this way, the user can decide which pipelines to delete.
Coordinates out of Limit
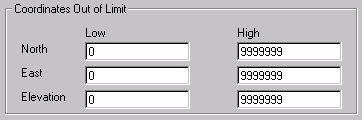
This option allows pipelines and equipment to be located which lie outside a set volume. This volume (between two space points) specifies the extremities of the plant.
The pipelines are not deleted automatically, but are entered in an access table (bad_lines). These pipelines can be deleted at a later stage with the "Tools Bad Lines" option.
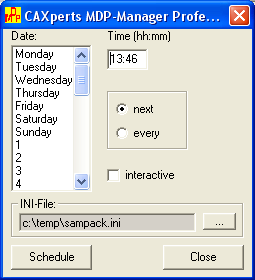
Start Time
This option allows you to program the run to start at a later point in time.
 check option
set time
press “Start”
MDP-Manager checks, if all settings are correct and waits until the time is reached, then the program run can begin. Meanwhile the window is minimized.
Events log
Shows the last 5 rows from the log-file. By click one time with the right mouse button the log-file will be opened with a text editor.
Menu
File
Configuration Wizard
Creates a new or edit an existing configuration file. See also “QuickStart guide” about the usage of the configuration wizard.
Open Config File
Load the project and the settings from the selected config file.
Save config file as
Save the current config file with filename.
Create RIS dump
Unlaod the pd- and mto-scheme of the current project, archive and store in the named .zip file.
Transfer from RIS dump
Load files from RIS dump file into mto-scheme of the currentproject, after that data will load in Access database automatically.
Apply functions on Access database
All functions of MDP-Manager will work after unloading data into database, like quality scripts, decoding.
History
List of the 5 last used config files in chronological order.
Exit
Close the application.
View
View MDP Errors
Shows the decoded MDP error table (pd_table 180). Additionally to the navigation functionality like “First”, “Last”, “Previous” and “Next”, it is possible to display failure dirctly in Microstation, by pressing the button “Open in Microstation”.

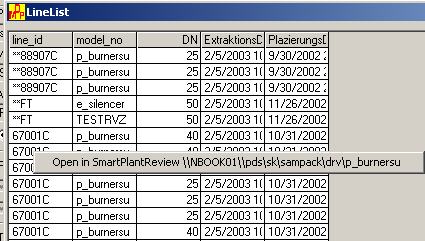
Project Control
List of select-querys from the MDP-Manager config file. If in these SQL statements the first column is “pipeline_id”, by right-click in project control window appears a popup menu with all corresponding drawings of this pipeline. You can open these with SmartPLantReview or Microstation.
Example:
[ProjectControl]
LineList=SELECT pipeline_id FROM pdtable_12
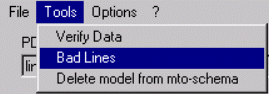
Tools
BadLines Module
Manages the incorrect or erroneus lines in Access database.
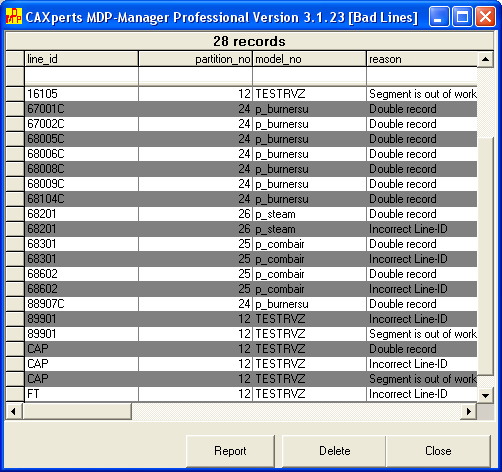
After creation of an Access database the quality scripts are running, which consist of the following parts:
Verification of pipeline name and equipment name by defined rules; (to configure by Check Pipeline-ID and EQP Name).
Verify, if all components of a pipeline exist in a defined working area (to configure by Coordinates out of limit).
Examination to avoid redundant data records in database.
All erroneous pipelines will be stored in table bad_lines and are managed by the BadLines-module.
You have the possibility to delete one or more pipelines in the database, by select the items in the list below and press the Delete-Button. A printable report will be created by pressing the Report-Button.
Sort values with click on a column header. To display only items, that fulfill user-defined criteria, it need to set a filter. To define a filter, you have to enter a criteria in the first row. More filters at the same time can be set.
DeleteModels Module
Management of the models in mto-scheme from PDS project.

One or more models can be deleted from mto-scheme, without starting the MDP job again, just select items to delete and press the Delete-Button.
Blue data records are Equipment models
Green data records are Piping models
Red data records are Structural models
Sort values with click on a column header. To display only items, that fulfill user-defined criteria, it need to set a filter. To define a filter, you have to enter a criteria in the first row. More filters at the same time can be set.
PartsList Module

This tool is for creation and management of parts lists.
A table (ident_alloc) of the whole component parts of a project will be created. Each part get its own definite number (Ident-Number) by hand or automatically. With this number parts lists can be assembled and declare increase/decrease of a component part.
In case of addition new component parts, the table ident_alloc will be updated and the part get a further number .
Proceed:
select a current Access database containing project data
select database for table ident_alloc with Ident-Number
Within this database a table with all component parts of the project will be created. This table contains a definite number for each part. Save this database to use an existing database on the next run.
Press button “Update ident_alloc table”
Creates a new table with all component parts of the project. If already exist, the missing parts will be added. The user is able to add additional colums.
Press button “Generate IdentNo”
All parts which are not owning any number get now a new one.The first number is taken form field “starting IdentNo”. You can assign a number by hand, just enter the according number (only numeric values) in table “ident_alloc” at column “ident_no”.
To assign all numbers, the switch “Remake all IdentNo” must be set. Any old numbers will be overwrite.
Press button “Write IdentNo to siz_dep_comm_code”
Write new assigned numbers into database with project data.
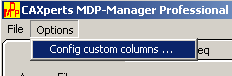
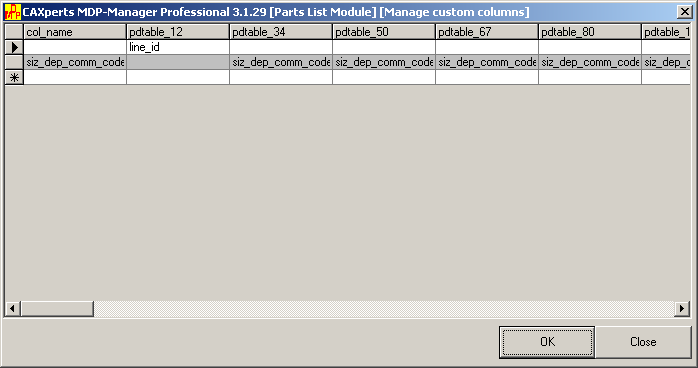
User-defined colums can be add into table “ident_alloc” by calling Config custom colums in the option menu.
For any new column, which is to add in table “ident_alloc”, there is one row to enter.
Define name for the new column (col_name), that is not necessary.
Select a column for each table from which data will be add in table “ident_alloc”.
Select either from pdtable_12 or any other tables. It is not necessary to define colums for all tables (a single table is sufficient).
If you need more tables, go back to Step 1.
Press button “OK”, to save changes, to quit without saving, press button “Close”.
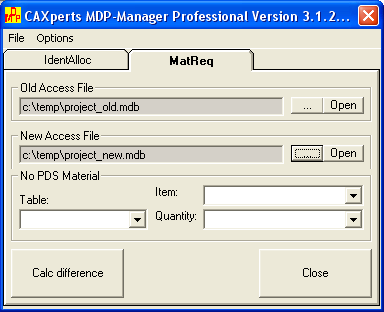
With help of MatReq two Access databases will be compared against each other and load the increase/decrease in a list for differences by pressing the button “calc difference”. Thereby it is possible to evaluate the temporarily created parts lists with its quanitity changes.
VerifyData Module
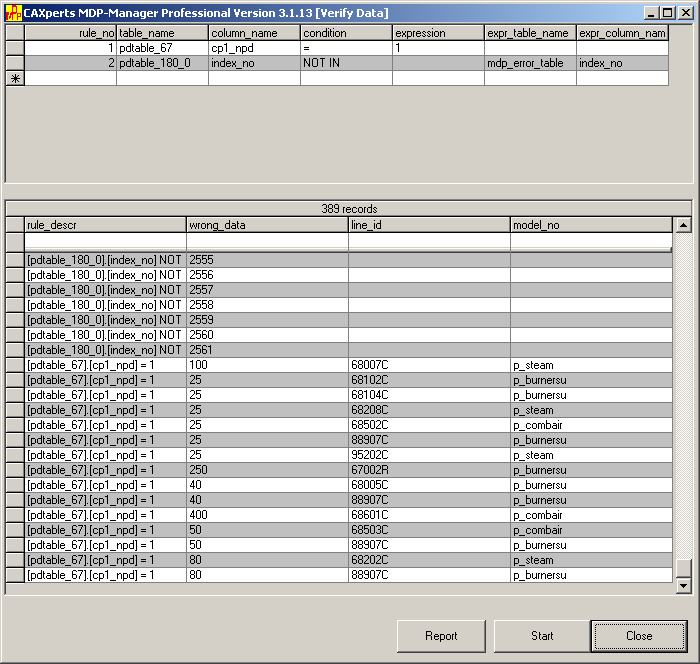
This powerful tool ables you to early identify user-input failures in an easy and fast way.
Run verification in the following order:
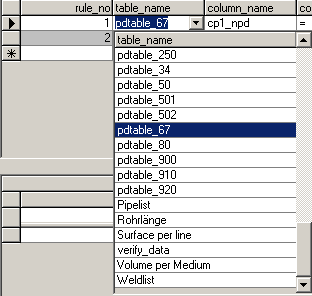
Choose the table to verify
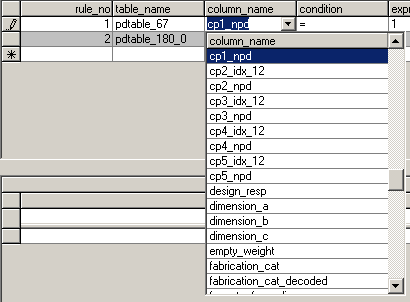
Select column
Choose logic
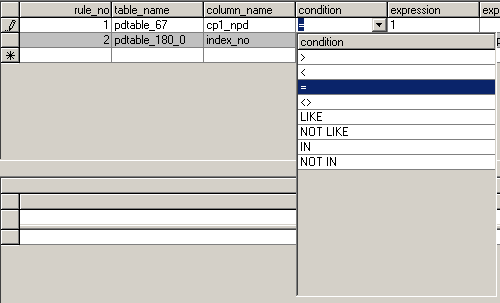
If you choose the logical operators “IN” or “NOT IN”, “expr_table_name” and “expr_column_name” must be set (see Step 1). It is not possible to write values in the column “expression”.
For any other cases “expression” must be entered.
If any other rules are necessary, go back to Step 1.
Press “Start” to display the results and write to table “verify_data”.
Press “Report” to build a printable report.
Sort values with a click on the column header. To only display items, that fulfill user-defined criteria, a filter needs to be set. To define a filter, you have to enter a them in the first row. Additional filters can be set.

Rules define validate values. Values, which don´t fulfill the rules will not be displayed.
To grade text values, there is a strong function, but easy to handle.
| Entsprechung | Muster | Entsprechung (gibt True zurück) | Keine Entsprechung (gibt False zurück) |
| Mehrere Zeichen | a%a | aa, aBa, aBBBa | ABC |
| Mehrere Zeichen | %ab% | abc, AABB, Xab | aZb, bac |
| Sonderzeichen | a[%]a | A%a | Aaa |
| Mehrere Zeichen | ab% | abcdefg, abc | cab, aab |
| Einzelne Zeichen | A_a | aaa, a3a, aBa | ABBBa |
| Einzelne Ziffern | a#a | a0a, a1a, a2a | aaa, a10a |
| Zeichenbereich | [a-z] | f, p, j | 2, & |
| Außerhalb des Bereichs | [!a-z] | 9, &, % | b, a |
| Keine Ziffern | [!0-9] | A, a, &, ~ | 0, 1, 9 |
| Kombination | a[!b-m]# | An9, az0, a99 | abc, aj0 |
WriteToPDS Module
(available only in Professional Version)
This module enables easy and efficient changes in the design scheme of the project.
Note: This module can destroy the whole project, please make a backup storage of your PDS-project before using this module.
CAXperts GmbH refuses any responsibility in case of losing data.
Proceed:
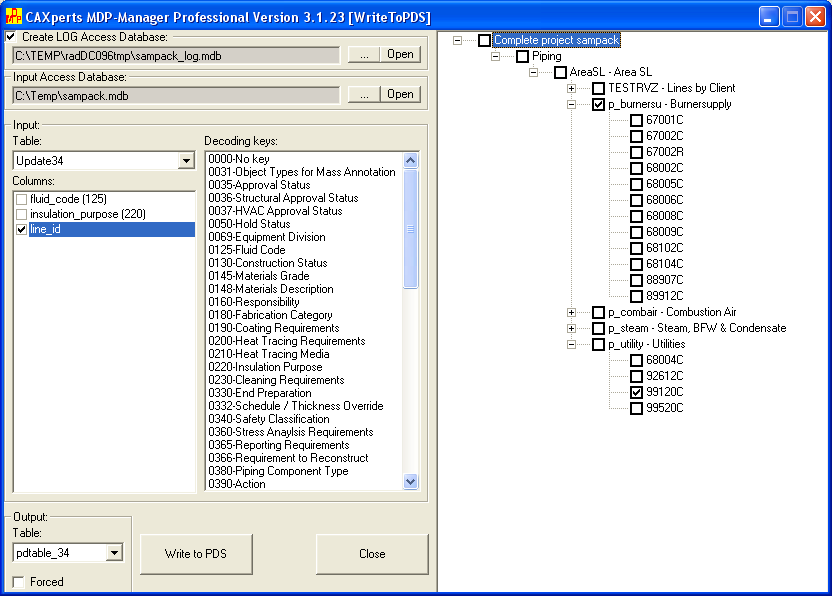
Select Access database for input. Contains table(s) or query(s) with values to write to PDS.
Take a choosen table or query from the input database. All column names and data types must agree with the column names and data types from the output database.
Values inside colums of tables/querys can be decoded. Use Drag&Drop method to decode with the according key. Just drag key and drop over the column you want to decode. To delete a decryption drag key “0000-No key” over the according column and drop it.
Define criteria colums. These are conditions, which will be considered when writing data to PDS. Values from criteria columns will not be write back to PDS. More criteria colums can be defined, but it is not required.
Choose output table, design scheme table of the project, to write into.
“Forced” switch
If switch “Forced” is not set, only that values will be write to PDS, which are not existing before (old values will not overwrite). In case of an active switch, all values will be write to PDS, maybe also some old ones.
Select change area. All changes will be done in complete project, in defined areas, models, or even in defined pipelines.
Activate Log and choose LOG-Access database. All changes in projects design scheme will be minuted.
Press button “Write to PDS”, write data to PDS.
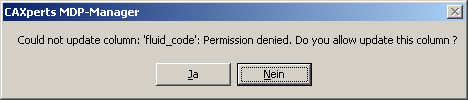
As default setting it is not possible to change values in PDS by WritetoPDS.
You have to release explicit each column by answer the following question with “Yes”.
Schedule Module
With the help of this task planer it is possible to schedule the start of MDP-Manager at any time. A config file must be selected to give it to MDP-Manager as parameter.
Integrate with Batch Isogen Processing
Integrates the MDP-Manager into Batch Isogen Processing. This enables to updating resp. changing values in design scheme of the current project before proceed with generate ISO-files via WritetoPDS module in MDP-Manager.
Help
Help
Shows the Help file.
MDP-Manager on the web
Link to the homepage of CAXperts GmbH (http://www.caxperts.de/), opens a new browser window.
E-Mail Technical Support
Opens a new message into your default email-client and adresses to mailto:support@caxperts.de.
Update Licence

Button “Test licence” checks licence number.
Button “OK” saves entered licence key.
Button “Cancel” close the window without saving any changes.
About
Shows a dialog window with informations about MDP-Manager, e.g. version, licence data.
System-Administration
Preparations for MDP
“mto”-database user and RIS schemes must exist. Before the first MDP run of a new project database tables must exist.
Procedure:
Start Intergraph MDP
Select project
Confirm message by press “OK”
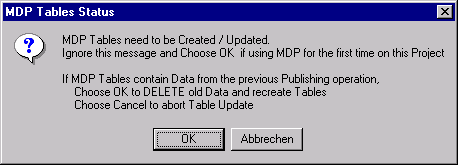
Exit MDP
Batch Mode
To run all commands in batch mode it is required that all environment variables (RIS_PARAMETERS, TEMP,…)are set with verified values. Additionally users must own corresponding system rights.
Unload data in Access database
To run software in batch mode, call MDP-Manager with parameter Config file.
Example:
c:\path\mdpmgr.exe c:\path\project.ini
Write data back to PDS
Also in batchmode there is the possibility to write back data to PDS. In this case you have to call MDP-Manager with two parameters:
parameter: Directory with config files, or whole file path
parameter: Isogen Batch Input-File
Example:
c:\path\mdpmgr.exe c:\path\to\config_files\ c:\path\isobatch.txt
or
c:\path\mdpmgr.exe c:\path\project.ini c:\path\isobatch.txt
If the first parameter is a directory with config files,config file and project name must be equal (e.g. settings for the PDS project “project” must be saved in file(“project1.ini”).
Appendix
Description Configuration file
Main configuration file
The main configuration file mdpmgr.ini must exist in the same directory as mdpmgr.exe (program directory).
[MDP-Manager]
Licence=1234567
Software-Licence number.
[PDTablesDescr]
Tables short description, which are shown in „Extended Select Table” - window.
Format: table name=description
Example:
[PDTableDescr]
pdtable_101=Project Description Data
[MTOTablesDescr]
see chapter [PDTableDescr]
[RaTablesDescr]
see chapter [PDTableDescr]
[DecodedMDPErrors]
MDP-Error description, used at decryption in pdtable_180 (see mdp_er-ror_table).
Format: Error number=Description
Example:
[DecodedMDPErrors]
210=failed to read linkage
[MDPErrorViewerColumns]
Column length from module ViewMDPErrors.
Format: Column name=Length
Example:
[MDPErrorViewerColumns]
error_code_decoded=1530.142
area_name=1514.835
[Oracle]
Defines the decoded password and the username for the Oracle Database and has a higher priority, if this item is missing in projekt file. See also item 2.2.1 und 6.2.11.
[Oracle]
User=system
Password=edacmncmlpcclp
[History]
List of five recently used config files. Callable in Menu File.
Example:
[History]
INIFile1=c:\temp\config1.ini
INIFile2= c:\temp\config2.ini
Project – Configurations file
[MDPmgr]
Project=projname
PDS-Projectname, used by MDP-Manager.
MDBFile=C:\Temp\Project.mdb
Path to MS Access database, in this case extraction target file. If no filename is given, MDP-Manager generate filename automatically.
Temp=C:\TEMP
Directory to store temporary data. If Temp-variable is set in MDP-Manager configuration file, it will be used. Otherwise the system-variable TEMP will used.
RISPath=C:\Win32App\RIS\
Directory with RIS-Utilities. If these paths are not set in environment variables, you have to set it here.
OracleServer=ServerName
Oracle-Server with PDS-Projects. If a connection can be established to Oracle Server „ServerName”, then data will be unloaded from PDS Oracle Client. MDP-Manager data access with Oracle-Client is more faster than RIS.
MDBSeed= C:\Temp\mdbseed.mdb
Path to standard template MS Access database. File will copied in MDBFile before loading data from PDS. If CreateNewAccessFile=0 then Seed-File is disregarded.
DGNSeed= C:\Temp\dgnseed.dgn
Path to standard template DGN-Drawing. DGN Seed File will used to display errors in ViewMDPErrors module.
OnlyTransferToAccess=0
If OnlyTransferToAccess=1, then data from mto_schema will extracted without starting the MDP-Batch Job. If OnlyTransferToAccess=0, then MDP-Batch Job is started at first, after that data from mto_schema will extracted.
StdNote=1
(Re)Publishing Standard Note Library
LongMat=1
Resolve Long Material Descriptions
ShortMat=1
Resolve Short Material Descriptions
Forced=1
Forced Publishing of Selection Set specified
CreateNewAccessFile=1
If CreateNewAccessFile=1 then data will loaded into new Access-File and the old file is stored. If CreateNewAccessFile=0 then data will loaded into existing Access-File. In this case only tables will overwrite, querys will ignored.
TransferOnlySelectedModels=1
If TransferOnlySelectedModels=1 then only data for selected models from PDS will load into Access database. Otherwise all data will load. This Limitation relates only mto_schema. All other schemas and its data will loaded independently.
[LoadTable]
This chapter defines tablenames, which should load into Access database.
Format: Table[1-100]=TableName|Prefix of Schemaname
If no prefix in schemaname is named then table from mto_schema will load. If projects ra_schema is in a differential format than „ra_projectname”, enter complete name of ra_schema behind the Pipe sign.
Example:
The ra_schema of PDS-Project „test1” is called ra_test1. In MDP-Manager config file it looks like this:
[LoadTable]
Table1=pdtable_500|ra
Table2=pdtable_12
Table3=pdtable_113|pd
But if ra_schema for PDS-Project „test1” is called ra_standart, you have to change the config file as follows:
[LoadTable]
Table1=pdtable_500|ra_standart
Table2=pdtable_12
Table3=pdtable_113|pd
This chapter [LoadTable] will be ignore complete, if chapter [LoadAllTablesFromSchema] is not empty. Up to 100 tables can be defined.
[LoadAllTablesFromSchema]
This chapter defines schemanames, which should load into Access database.
Format: Schemaname=1
Entry „other schemas” means all other schemas except pd_schema, mto_schema, ra_schema and dd_schema.
Example:
[LoadAllTablesFromSchema]
pd_test1=1
mto_ test1=1
ra_ test1=1
other schemas=1
This chapter [LoadTable] will be ignore complete, if chapter [LoadAllTablesFromSchema] is not empty.
[Quality]
If coordinates borders are set, MDP-Manager will check, if all component parts are within these borders. Data records with erros will add to table „bad_lines”.
Example:
[Quality]
Loweast=0
LowElev=0
HighNorth=999999999
HighEast=999999999
HighElev=999999999
If PipeLineID and/or EQPLineID are set, Pipelines (Line-ID) and/or Equipments (EQP-Name) will check, if they fulfill the rules as follows:
Rules:
n (lower case) - any number
c (lower case) - any character
Other signs (A, X, -, _, .) will used as written.
Example:
[Quality]
PipeLineID=nnn-ccc-nnn
EQPLineID= nnn-ccc-nnn
[CustomIndex]
Define columns in this chapter for which an index will created, after loading data from PDS.
Format: Index[1-100]=tablename|columnname.
Example:
[CustomIndex]
Index1=pdtable_12|LINE_SEQUENCE_NO
Index2=…
Up to 100 entries can be defined in this chapter.
[SQL]
This chapter describes SQL-Statements, which execute after loading all tables. Format: SQL[1-100]=SQL-Statement.
Example:
[SQL]
SQL1=INSERT INTO table SELECT line_id FROM pdtable_12;
SQL2=…
Up to 100 entries can be defined in this chapter.
[Query]
Define queries here, to import it into Access database. Format: Query[1-100]=Queryname|Querytext.
Example:
[Query]
Query1=Surface per line|SELECT * FROM pdtable_12;
Query2=…
Up to 100 entries can be defined in this chapter.
[ProjectControl]
Define Selection queries here. Display query results in MDP-Manager Menu (Tools->Project Control->“Name”). „Name” is the query’s name (in this case „LineList”).
If „line_id” is the first column name of the query then all DGN-Drawings according to this pipeline will displayed by right click in Project Control PopUpMenu window. Open with SmartPlantReview or Microstation.
Example:
[ProjectControl]
LineList=SELECT line_id FROM pdtable_12
[RunBefore]
Define command line statements here to run before extraction.
Format: Run[1-100]=DOS-Commands
Example:
[RunBefore]
Run1=copy c:\temp\project.mdb c:\temp\project.mdb.old
Run2=…
Up to 100 entries can be defined in this chapter.
[RunAfter]
Define command line statements here to run after extraction.
Format: Run[1-100]=DOS-Commands
Example:
[RunAfter]
Run1=copy c:\temp\project.mdb c:\temp\project.mdb.old
Run2=…
Up to 100 entries can be defined in this chapter.
[Oracle]
Define here the project specific decoded password and the according username. Use Copy&Paste to paste this entry into mdpmgr.ini and make it available for all projects.
[Oracle]
User=system
Password=edacmncmlpcclp
[ColDescr]
Define comments for columns in Access database here.
Format: Desc1=tablename|columnname|description.
Example:
[ColDescr]
Descr1=bad_lines|line_id|Leitung
Up to 100 entries can be defined in this chapter.
[ColCopy]
Define columns to copy in this chapter.
Format: Copy[1-100]=source_table.source_column|target_table.target_co-lumn
If target columns doesn’t exist, it will created.
Example:
[ColCopy]
Copy1=pdtable_34.commodity_code|pdtable_34.siz_dep_comm_code
Copy2=…
Up to 100 columns to copy can be defined in this chapter.
[Relation]
Define new relationships between tables.
Format: Relation[1-100]=Table|Column1[,Column2[,ColumnN]]|ForeignTable|ForeignColumn1[,ForeignColumn2[,ForeignColumnN]]
Example:
[Relation]
Relation1=pdtable_12|system_unique_no,partition_no|pd-table_80|idx_12,partition_no
Relation2=pdtable_12|partition_no|pdtable_900|par-tition_no
[Decode]
In addition to the automatically decoded columns by MDP-Manager, you can define self created columns, which will decoded.
Format: Decode1=table name|column name|decoding key
Example:
[Decode]
Decode1=pdtable_12|fluid_code|125
Decode2=…
Up to 100 entries can be defined in this chapter.
[DecodeSteel]
Decoding columns from table pdtable_532 (Steel).
Format: Decode1=column name|attribute name
Example:
[DecodeSteel]
Decode1=design_status|Design_Status
Decode2=fabr_note|Fabricator_Note
Up to 100 entries can be defined in this chapter.
[ReplacePath]
Replace path to DGN-Files in ViewMDPErrors-Module.
Format: Path1=Search|Replace
By viewing errors with ViewMDPErrors-Module, the according DGN-Files will displayed in MicroStation. Path to files will automatically find from PDS. If DGN-Files are not reachable in this path (e.g. no user rights on all drives/directorys are set), you can replace it here.
Example:
MDP-Manager has find the following path to file test1.dgn:
\\PDS-Server\d\pds\project\test1.dgn. The host machine which runs MDP-Manager has a mapping called O:, which is connected to the following directory on PDS-Server: \\PDS-Server\d\pds.
This means you can reach this file by two ways:
\\PDS-Server\d\pds\project\test1.dgn
O:\project\test1.dgn
In this case you can enter the following replace rule in MDP-Manager configurations file:
[ReplacePath]
Path1=\\PDS-Server\d\pds|O:
Now MDP-Manger has access to file test1.dgn over path \\PDS-Server\d\pds\project\test1.dgn .
Up to 100 entries can be defined in this chapter.
[SchemasPass]
Set schema passwords to access data by using Oracle-Client.
Format: Schemaname=Password
Write password in reverse order. Passwords are case-sensitive, so upper- and lowercase are relevant to it, except in schema names.
If no password is defined to schema, password is set to schema name automatically.
Example:
Schema pd_test1 gets password “pass1”:
[SchemasPass]
PD_TEST1=1ssap
[Export2Excel]
Exportation data from Access database into MS Excel. The Excel-File will generate automatically in same folder and with same name (Extension *.xls) as Access database file.
Format: Export[1-100]=table-/queryname
If you want to export all tables and querys, use the following syntax:
Export1=*
Example:
[Export2Excel]
Export1=pdtable_12
Export2=pdtable_34
[PartsListModule]
After the MDP-Manager run, Parts-List Module will start. If no Access database is defined, MDP-Manager database will used. If no Access database for Ident-table is defined, a database will created automatically.
If no start number is defined, then start value for Ident-Number is 1.
If UpdateIdentTable=1, then ident_table will created/updated.
If GenerateIdentNo=1, then component parts without according number gets a generated IdentNo.
If WriteIdentNo=1, then IdentNo will write back to Access database in column size_dep_comm_code.
Example:
[PartsListModule]
UpdateIdentTable=1
GenerateIdentNo=1
WriteIdentNo=1
[IdentAlloc]
Chapter to store settings for PartsList-Module.
StartIdentNo=1
Start value for Ident-Number.
MDBFile= C:\Temp\Project.mdb
Path and name to database file in which Ident-Number will written.
IdentMDBFile= C:\Temp\Project_ident.mdb
Access database with ident_alloc-Table.
[MatReq]
Chapter to store settings for PartsList-Module.
NewMDBFile= C:\Temp\Project_new.mdb
New database file to compare.
OldMDBFile= C:\Temp\Project_old.mdb
Old database file to compare.
NoPDSMatColumnItem=item
Column name with key for Non-PDS-Material.
NoPDSMatColumnQuantity=quantity
Column name with values for Non-PDS-Material.
NoPDSMatTable=test
Table name, which contains Item- and Quantity-columns.
[WriteToPDS]
OutputTable=pdtable_12
PDS-Table name, to write back date.
InputTable=Abfrage1
Input Table or Query
Forced=0
If Forced=1 then all data will overwrite in PDS. If Forced=0 then only „NULL” values will change.
InputMDBFile=c:\Beispiele\demo.mdb
Input Access database.
If no Access database is defined, MDP-Manager database will used.
CreateLogFile=1
If CreateLogFile=1 then a Log-Access-File will create.
LogMDBFile=c:\Beispiele\demo_log.mdb
LOG Access database.
If no Log Access database is defined, one will build automatically.
[WriteToPDSAllowUpdateTables]
Define tables in this chapter, which can be changed by WriteToPDS-Module.
Format: Tablename=1 or *=1 (All tables might change)
Example:
[WriteToPDSAllowUpdateTables]
pdtable_12=1
[WriteToPDSAllowUpdateColumns]
Define columns in this chapter, which can be changed by WriteToPDS-Module. Format: Columnname=1 or *=1 (All columns might change)
Example:
[WriteToPDSAllowUpdateColumns]
fluid_code=1
[Abfrage1]
In WriteToPDS-Module for each input table/query a separate chapter will build which is named like input table/query. In this chapter columns settings will storedIn diesem Abschnitt werden Spalte-Einstellungen (condition column, output-column,column-key) in following format:
Columnname=[0,1]|Decoding-key
If exist a Decoding-key then this columns will decoded by table pdtable_250.
Example:
[Abfrage1]
fluid_code=0|125
fluid_code-column from table/query is an output column, which must be decoded by table pdtable_250 with key 125.
line_id=1|
line_id-column from table/query isa condition column (input column).
piping_mater_class=0|
piping_mater_class-column from table/query is an output column.
[VerifyDataRules]
Define and store rules for VerifyData-Module in this chapter.
Format:
Logic: „IN” or „NOT IN”:
Rule[1-100]=Tablename.Columnname|Logic|Tablename.Columnname
For all other logic types:
Rule[1-100]=Tablename.Columnname|Logic|Value
Example:
[VerifyDataRules]
Rule1=pdtable_12.npd|<>|0
Rule2=…
Up to 100 entries can be defined in this chapter.