Introduction
CopyMoveRotate is a software utility for copying, moving and rotating models and drawings in Intergraph PDS (rotation of drawings and moving/copying of drawings with composite views is not supported in this version). Copying of models is possible inside a single project as well as between two projects. Lines and equipment may be copied between projects and deleted. Additionally, design schemas (Line IDs, Unit Code, etc.), equipment and raceway attributes can be edited using Microsoft Excel. CopyMoveRotate also provides functionality for changing Site IDs (and/or model index numbers or partition numbers, names and descriptions) of models and drawings. Names and descriptions can also be edited for areas. CopyMoveRotate may also be controlled via command line parameters.
Installation
Setup
Requirements:
- Supported operating systems:
Microsoft Windows XP
Microsoft Windows Server 2003
Microsoft Windows Vista
Microsoft Windows 7 or later
PDS 6.4 or later
MicroStation SE/J
Microsoft Excel 2000 or later
Administrator rights are required on each computer to install CopyMoveRotate.
Uninstall
To uninstall the software, select Control panel from the start menu. Then on
Windows 7-10: in large or small icon view, click Programs and features. If you're using category view, under Programs, click Uninstall a program.
Windows Vista: in classic view, double-click Programs and features. In control panel home view, under Programs, click Uninstall a program.
Windows XP/2000: (Double) click the Add or remove programs icon.
Select the program you want to remove, and click Uninstall/Remove. Alternatively, right-click the program and select Uninstall.
Setup command line (for administrators)
The following command line options are supported by the installer:
/S:<<optional ini file>>
Allow an install to be run in silent mode. As a result, no screens or dialogs will be shown.
This command line option also has an optional INI file that can be passed containing session variable values. For example:
"C:\output\setup.exe" "/S:C:\setupvars.ini"
This will cause the session variables in the INI file to be used for the setup. The INI file should be in the format:
[SetupValues]
%AppFolder%=C:\Program Files\MyProduct
/U:<<XML config file>>
This command line option must be used when calling the uninstall program from the command line. This command also has an optional XML file that can be passed containing session variable values. For example:
"C:\Program Files\MyProduct\uninstall.exe" "/U:C:\Program Files\MyProduct\irunin.xml"
Licence
CAXperts software supports two types of licences:
Site licence (local)
Domain based licences are restricted to machines within a 5 miles (8 kilometres) radius at a specific geographic location (building) for which the licence key file was issued for. There is no limitation regarding the number of users or machines.
CAXperts will need your Current domain name to issue a licence file (.lic).
The licence file has to be stored on a local or network location accessible by the machine running the CAXperts product; a licence server is not required.
The location of the licence file should be defined on every machine with the CAXperts product installed, which can be done
Either by setting the environment variable
CAXPERTS_LICENSE_FILE=C:\Program Files (x86)\CAXperts\Licensing\Or by setting the registry key
> HKEY_CURRENT_USER\Software\FLEXlm License > Manager\CAXPERTS_LICENSE_FILE=C:\Program Files > (x86)\CAXperts\Licensing\
Multiple licence key file locations should be separated by semicolons (“;”).
If the licence key file location is not defined, “C:\Program Files (x86)\CAXperts\Licensing\” is used.
Floating (server) licence
Floating licences require a FlexNET server (lmadmin or lmgrd) accessible by the machine running the CAXperts product. The licence key file is typically located on the FlexNET server machine. The licence key file defines the maximum number of seats which can be used at the same time.
The location of the licence server must be defined on every machine with the CAXperts product installed, which can be done
Either by setting the environment variable
CAXPERTS_LICENSE_FILE=@YourServerNameOr by setting the registry key
HKEY_CURRENT_USER\Software\FLEXlm License Manager\CAXPERTS_LICENSE_FILE=@YourServerName
Every computer name must be preceded by the @ symbol. Multiple licence server locations should be separated by semicolons (“;”).
YourServerName is the Windows computer name of the machine running lmadmin (FlexNET server). If lmadmin is running on a non-default port, the port number should be defined like this: port@ YourServerName.
Borrowed licences
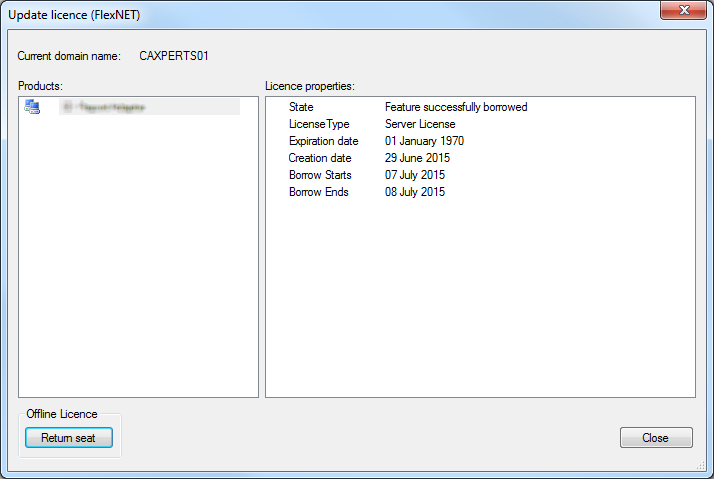
Licence seats can be borrowed for a period of time from the server and saved to the local machine. Once the seat has been borrowed the CAXperts application can be used without any connection to the FlexNET server.
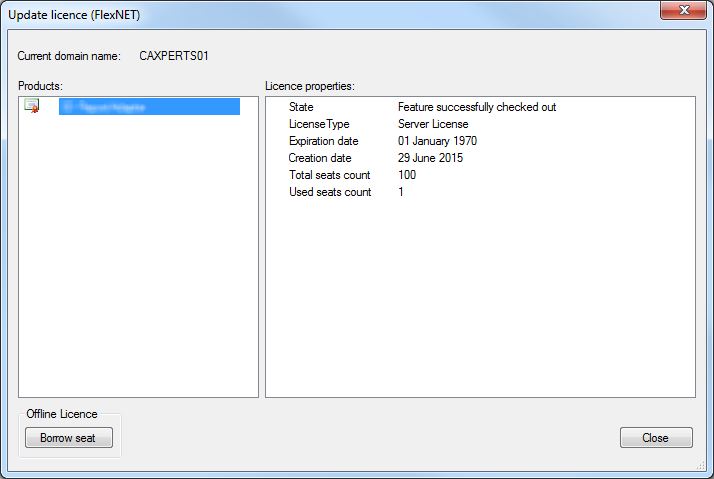
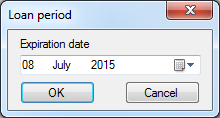
To borrow a licence seat press the Borrow seat button, define the loan period (up to 7 days) and press OK. When the borrowed seat expires it gets automatically returned back to the FlexNET server.
The seat can be returned earlier by pressing the Return borrowed seat button.
Working with CopyMoveRotate
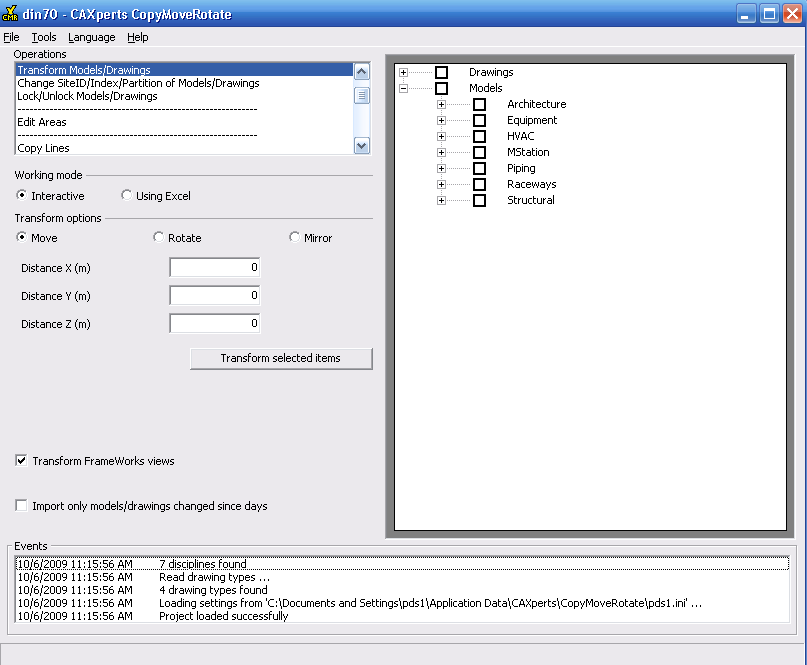
When you start CopyMoveRotate, the main window shows up:
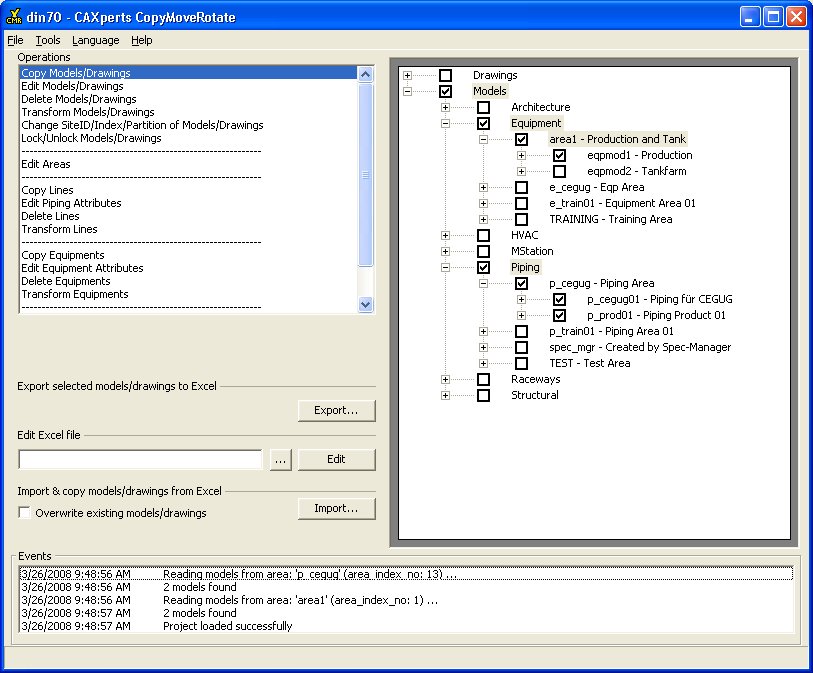
The main window is divided into three functional parts:
The control area on the left side
The project tree view on the right side and
The events log at the bottom of the window
Privilege manager
The Privilege manager allows you to lock functions for specific users/groups. The assignment of privileges is based on the Windows (domain) users and groups. This means that you do not have to establish a new privileges management system.
Group and user rights are linked by an OR operation: If a group has a certain privilege in CopyMoveRotate, every user in this group will have this privilege, even if this privilege is not explicitly stated in the settings for this user.
The access rights are stored in an Access database (CopyMoveRotate.mdb). This is located in the proj_file directory. The privileges are thus the same for all the projects in a proj_file.
Access to the Access database should be controlled using the Windows access rights.
The default setting is “Allow” for every user and group.
Settings
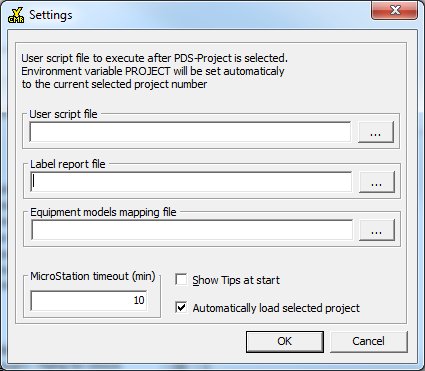
Go to Tools→Settings to show up the Settings dialogue.
User script file: If defined, CopyMoveRotate will execute a user defined script file (.bat). In this batch file, the project name is already defined in the environment variable PROJECT. This function may be used, e.g. if network drives containing project data have to be mounted or environment variables have to be set before the project can be accessed. In this case, PDS won’t be started via PD_Shell but via a special software program that executes the commands described above.
Label report file: if defined, CopyMoveRotate will update corresponding labels (see 3.13 Edit piping attributes).
Equipment models mapping file: if defined, CopyMoveRotate will preserve nozzle connections after copy of piping models (see 3.5 Copy models/drawings).
MicroStation timeout: defines the time out in minutes for the Transform models/drawings command.
Selecting a PDS project
Go to File → Select PDS Project, this shows this dialogue window:
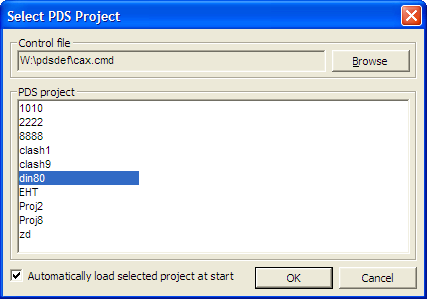
Select a PDS control file using the Browse button
Select a PDS project from the list (double-click on it)
Copy models/drawings
- Select the models/drawings or complete areas in the tree view for copying.
The Export function will transfer it to Excel
Edit the Excel file. There is one workbook for the models and one workbook for the drawings.
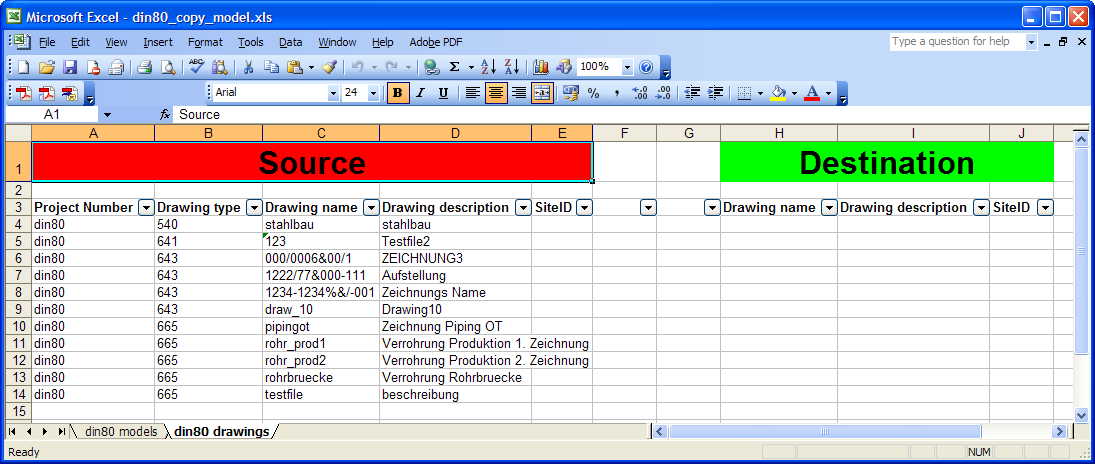
The source structure must not be changed. The new destination structure for models and drawings may be configured by the user. All fields there are optional (except drawing/model name), for empty fields the source value is taken. For existing areas and sub-projects, the description will be changed according to the respective destination field. After saving your input file, use the Import button to start the copy process. New areas and framework sub-projects may also be created in this way. The models and drawings (including the drawing views) will be copied.
Overwrite existing models/drawings: If this checkbox is ticked, CopyMoveRotate will check if there is already a model/drawing with the same name. If there is, it will be overwritten, i.e. the same model_index_no/partition_no/dwg_index_no will be used. This is reasonable if the same models/drawings are always copied automatically. Without this checkbox, the target models/drawings would have to be deleted and replaced from the original files manually. This would cause gaps in the usage of model_index_no/partion_no, the defined SiteID-range would overflow very quickly. If this checkbox is not ticked, copying will stop with an error message if a target file with an identical name exists.
Preserve nozzle connections: if a piping model contains nozzle connection(s), they become invalid after a copy (of piping and corresponding equipment models) because of the new partition_no for equipment model(s). To correct this and to preserve nozzle connections in piping models after copying, the equipment models mapping file has to be defined in the Tools->Settings. This file contains the mapping between source and destination equipment models and has exactly the same format as the Excel file for coping of Models/Drawings. Select the equipment models and click the Export button to create it. The destination model name must be defined and must exist before starting with copy of piping models.
The workflow demonstrating how to preserve nozzle connections:
- Select equipment models to copy
Export selection to Excel
Edit Excel file
Import and copy equipment models
Define the path to this Excel file from above in Tools-> Settings->Equipment models mapping file
Now proceed with copy of piping models
Copying of models between projects:
Export models in source project
Import models in destination project
Edit models/drawings
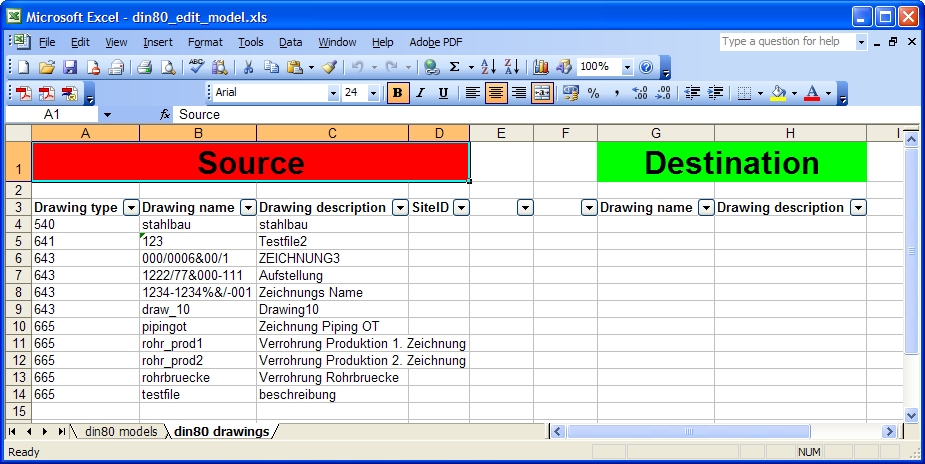
All models and drawings can be renamed (and/or model/drawing description can be changed) through an Excel workbook.
Delete models/drawings
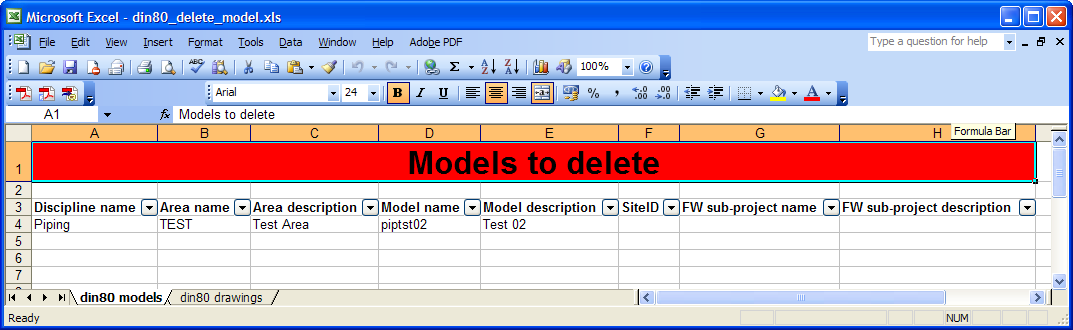
All models/drawings in the Excel file will be deleted. The file may not be changed.
Transform models/drawings
Before CopyMoveRotate starts a process, the participating models/drawing are saved in the backup directory. The directory for reporting and backups is C:\temp by default.
- Moving Models and Drawings
- Tick all models/areas or complete project you want to move
- Input distance values for the x, y, z direction to the new location
FrameWorks views will also be translated and rotated if the checkbox “Transform FrameWorks views” is checked
By pressing the Import button the models and drawings are processed consecutively.
- Rotating Models and Drawings
- For the pivot point of rotation an absolute coordinate value is needed.
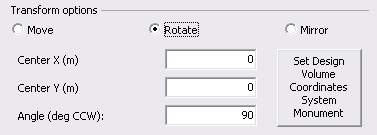
- If a Design Volume Coordinate System is used in the project, the values for this can be added in a separate form:
By pressing the Transform selected items button the models and drawings are processed consecutively.
Export … to Excel generates an Excel file:
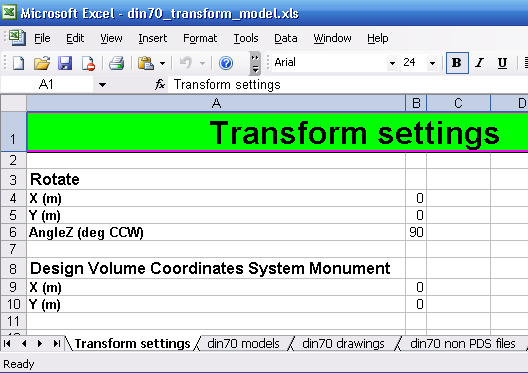
You may change the rotation settings on the first tab.
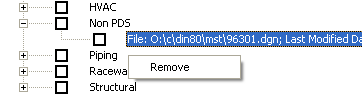
Handling for non-PDS files
MicroStation files can also be transformed by CopyMoveRotate.

Drag & Drop the directory with the MicroStation files or single .MicroStation file on the “Models” node of the tree view to treat the file as a model or on the “Drawings” tree node to treat it as a drawing.
Use the context menu (right mouse button) to remove non-PDS files from the tree view.
Change site ID, index or partition of models/drawings
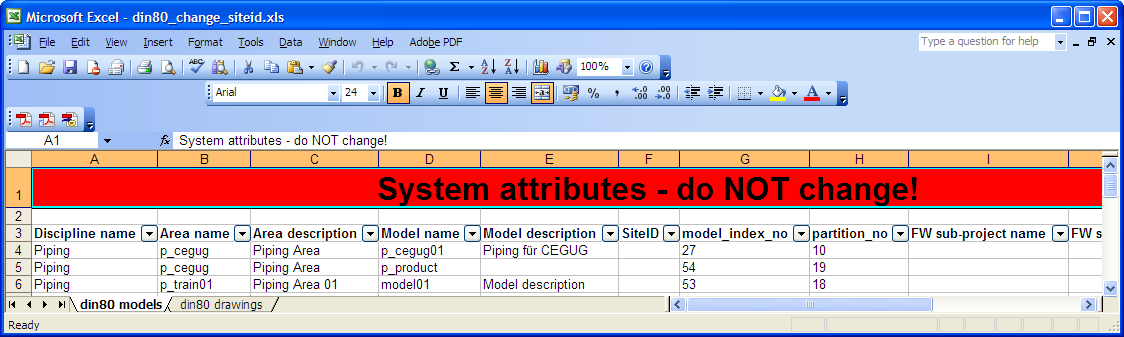
For all models the site_id, model_index_no and partition_no can be changed through an Excel workbook. For drawings the site_id and dwg_index_no can be changed accordingly.
The user has these options:
Key in a new SiteID (this SiteID must already exist)
Key in a new model_index_no/partition_no (has to be unused)
Key in a new SiteID and model_index_no/partition_no (model_index_no/partition_no have to be in the range of the new SiteID)
Correct reference files: if ticked, the logical names of reference files in all models of the project will be corrected, if the model_index_no of the edited model was changed. This can take some time if the project contains many models. If Correct reference files is not ticked, the logical names of the reference files won’t be corrected. Referenced models won’t be recognised as intelligent PDS models anymore, they will be displayed as standard MicroStation reference files. To correct this, the models have to be re-referenced manually in PDS.
Lock/unlock models/drawings
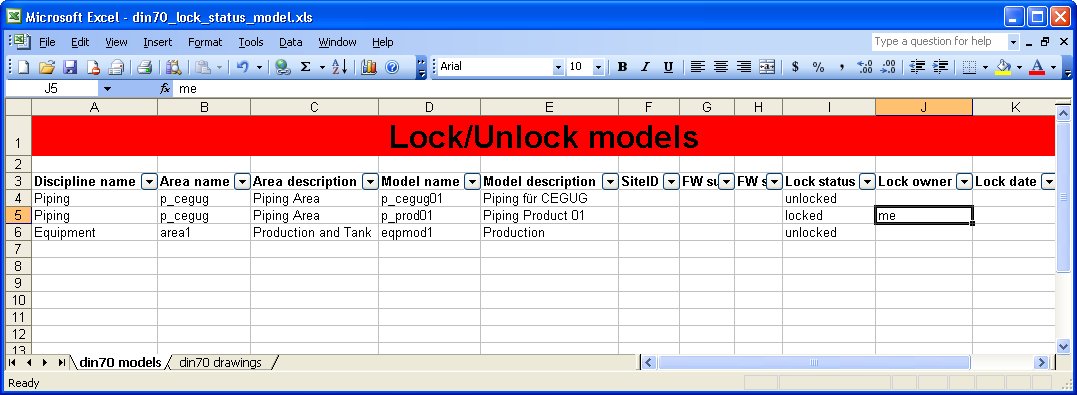
Models/Drawings may be locked or unlocked. Type in the keyword locked or unlocked in the Lock status column. Lock owner can be a user defined string. If nothing is entered the name of the current user will be used as Lock owner.
Edit areas

Area and/or description may be changed.
Copy lines
- Select the lines in the tree view for copying.
The Export function transfers them to Excel
Edit the Excel file.

The source structure must not be changed. The new destination structure for lines may be configured by the user. All fields are optional here (except model name), for empty fields the source value is taken.
Copying of lines between projects:
Export lines in source project
Import lines in destination project
|
|
There is no check against the label description library. If a LineID consists out of several attributes (e.g. fluid code + NPD + …) it won’t be automatically updated; concatenated values must be updated separately. This change of database values should therefore only be done by experienced PDS administrators. |
|
|
Project version, graphical symbology settings, RDB and DDL structure must be equal in source and destination projects. |
|
|
By default only unapproved lines will be processed. Enabling the checkbox Process approved items change this behaviour. |
|
|
Check for overlaps between segments: if ticked, CopyMoveRotate will check before copying, if line segments to copy overlap with segments of lines which are already in the target model (the line to copy will not be checked if it overlaps internally). The copy process will be cancelled if there is an overlap. If Check for overlaps between segments is not ticked, lines will be copied without any checks. |
|
|
Import only models/drawings changed since days: if defined CopyMoveRotate processes only models/drawings, which were changed within the last N days. The changes are recognized by using revision_date from pdtable_113. |
Edit piping attributes
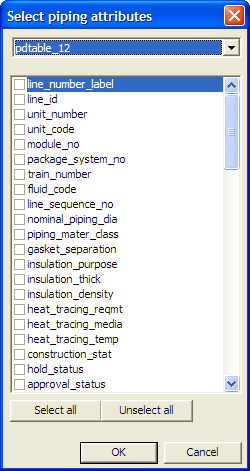
|
The Design Schema for piping attributes from pdtable_12, _50, _67, _80 can be revised with values from an Excel Workbook. For this, first configure the attributes you want to export by selecting the appropriate attributes from your single pd_tables. |
The attributes will be reported to an Excel file ( the report won’t be an 1:1 image of the DD-Schema). If the Group rows checkbox is ticked on the entries will be grouped also.
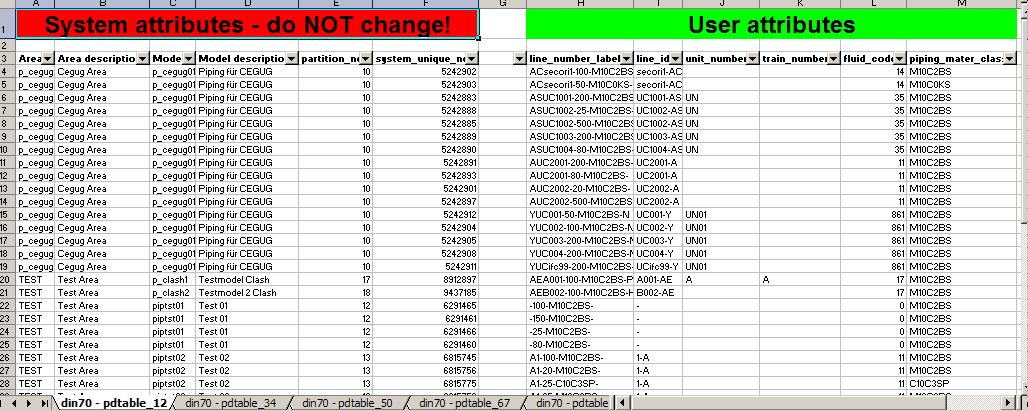
The different pd_table sections are in separate sheets. The attribute values can be adapted in the user attribute area.
Updating labels: if any of the attributes have been changed which are part of the label, CopyMoveRotate can automatically update the affected labels, if label report file is defined in Tools->Settings.
CopyMoveRotate reads the label report file and replaces the spaces by underscores in the all label names. If the resulting string exists as a column of pdtable_12 (DD-Schema), the label is updated. The following standard PDS label types will be always updated:
310 - line_number_label
311 - line_id
335 - inspections_iso_id
|
|
The user must not change attributes in the system attributes area. |
|
|
The change of database values should therefore only be done by experienced PDS administrators. |
|
|
Updating of labels is limited to standard PDS format settings and attributes. For special cases and settings the attributes which are updated by using labels have to be edited using Excel similar to stand-alone values. |
|
|
Naming conventions, attribute type and attribute length according design.ddl must be recognized. |
By default only unapproved lines will be processed. Enabling the checkbox Process approved items change this behaviour. The Group rows checkbox, which is ticked on by default, will eliminate redundant entries in the output Excel sheet. Import only models/drawings changed since days: if defined CopyMoveRotate processes only models/drawings, which were changed within the last N days. The changes are recognized by using revision_date from pdtable_113.
Delete lines
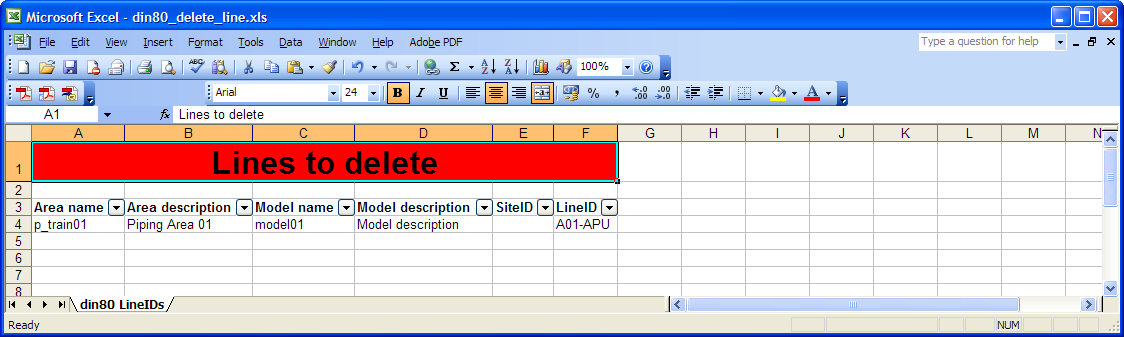
![]() All lines in the Excel file will be deleted. The file may not be
changed.
All lines in the Excel file will be deleted. The file may not be
changed.
Delete Lines can be used interactively or using
Microsoft Excel (for batch mode).
By default only unapproved lines will be processed. Enabling the
checkbox Process approved items change this behaviour.
Import only models/drawings changed since days: if
defined CopyMoveRotate processes only models/drawings, which were
changed within the last N days. The changes are recognized by using
revision_date from pdtable_113.
Transform lines
See chapter 3.8 Transform models/drawings.
![]() By default only unapproved lines will be processed. Enabling the
checkbox Process approved items change this
behaviour.
By default only unapproved lines will be processed. Enabling the
checkbox Process approved items change this
behaviour.
![]() Import only models/drawings changed since days: if
defined CopyMoveRotate processes only models/drawings, which were
changed within the last N days. The changes are recognized by using
revision_date from pdtable_113.
Import only models/drawings changed since days: if
defined CopyMoveRotate processes only models/drawings, which were
changed within the last N days. The changes are recognized by using
revision_date from pdtable_113.
Copy equipment
- Select the equipment in the tree view for copying.
The Export function transfers them to Excel
Edit the Excel file.
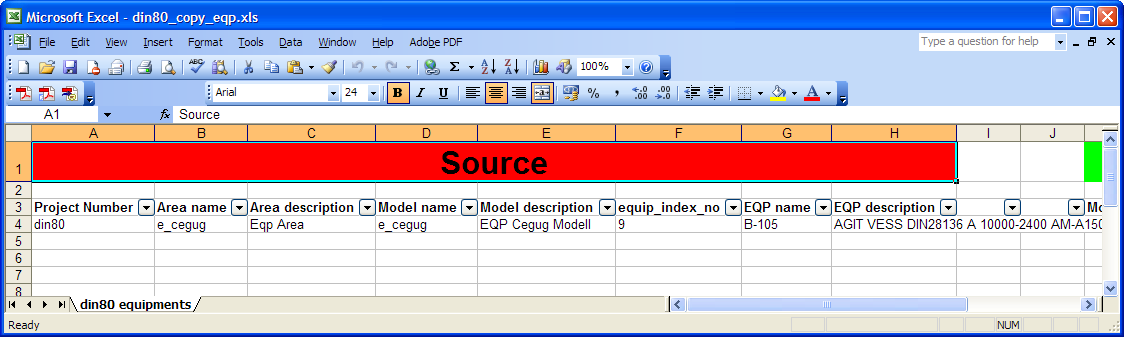
The source structure must not be changed. The new destination structure for equipment may be configured by the user. All fields are optional there (except model name), for empty fields the source value is taken.
Copying of equipment between projects:
Export equipment in source project
Import equipment in destination project
Edit equipment attributes
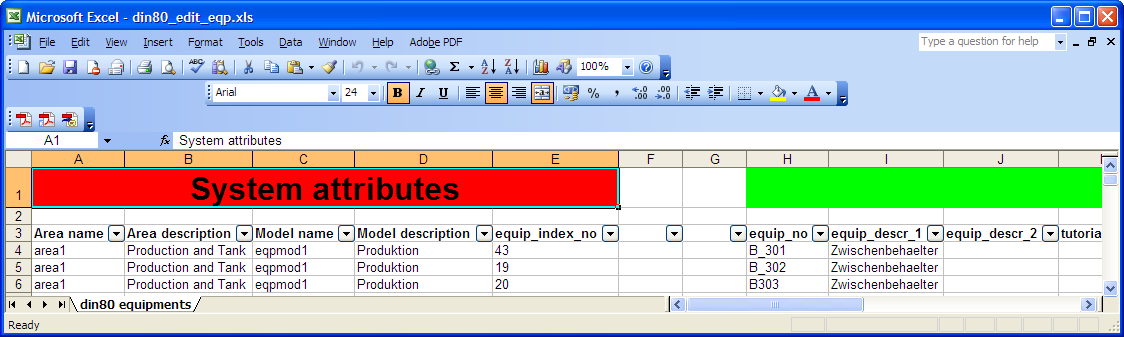
The attributes of all equipment selected in the tree view are written into an Excel file, where you can change these values. The saved Excel file can be imported and the attributes are updated accordingly.
Delete equipment

All equipment in the Excel file will be deleted. The file may not be changed.
Transform equipment
See chapter 3.8 Transform models/drawings.
Edit nozzle attributes
See chapter 3.17 Edit equipment attributes.
Edit raceway attributes
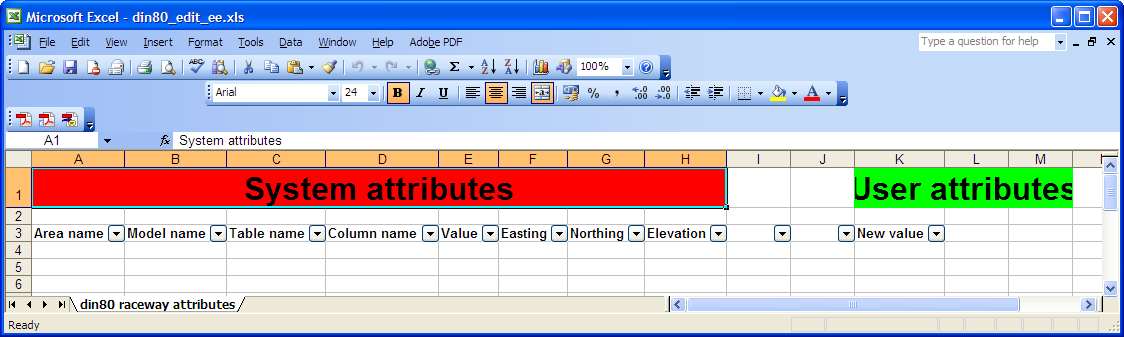
The attributes of all raceway models selected in the tree view are written into an Excel file, where you can change these values. The saved Excel file can be imported and the attributes are updated accordingly.
Edit reference files
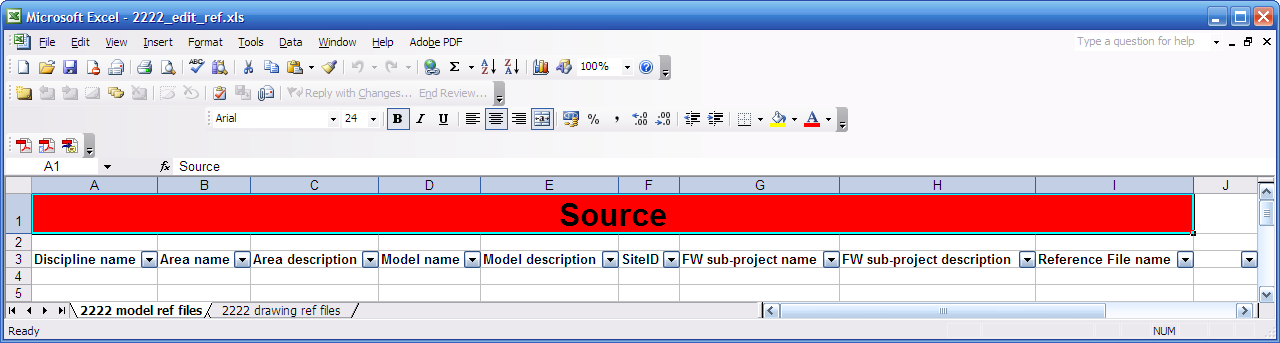
The user may change reference files of models/drawings with this function. If CopyMoveRotate finds the new reference file in pdtable_113 of the current project schema, it will automatically retrieve the logical name and description file and attach the reference file as an intelligent PDS model.
If the user changes the drawing border file, logical name and description of the new reference file will stay constant – “BORDER”, “DRAWING BORDER FILE”.
The source reference file will be replaced in all drawing views.
Command line mode
CopyMoveRotate also works in command line mode. If you click on Tools → Create batch file, a demonstration batch file will be generated.
copymoverotate /? shows the available command line parameters:
------------------------------------------------------------
CAXperts CopyMoveRotate
------------------------------------------------------------
Command line arguments for CopyMoveRotate.exe:
/CMD control_file.cmd - Path to the control file.
If control file is not defined, last
control file will be used.
/Project project_name - PDS-Project name.
If project name is not defined, last
project will be used.
/Mode mode - Execution modes:
MODEL_COPY - copy models/drawings
MODEL_EDIT - edit models/drawings
MODEL_DELETE - delete models/drawings
MODEL_TRANSFORM - transform models/drawings
CHANGE_SITE_ID - change SiteID/Index/Partition
of models/drawings
CHANGE_LOCK_STATUS - lock/unlock models/drawings
AREA_EDIT - edit areas
DD_EDIT - edit piping attributes
LINE_COPY - copy lines
LINE_DELETE - delete lines
LINE_TRANSFORM - transform lines
EQP_COPY - copy equipment
EQP_EDIT - edit equipment attributes
EQP_DELETE - delete equipment
EQP_TRANSFORM - transform equipment
EE_EDIT - edit raceway attributes
REF_EDIT - edit reference files of models/drawings
/XLS excel_file.xls - Path to the Excel file to process
/Config config_file.ini - Config file.
If not defined, last
config file will be used.
/export - If defined excel file
will be created for defined execution mode
/batch - If defined CopyMoveRotate
will be run in batch mode
Example:
CopyMoveRotate.exe /CMD control_file.cmd /Project project_name /Mode MODEL_COPY
/XLS excel_file.xls /batch
Colour mark-up in reports
Most CopyMoveRotate processes are reported into Excel workbooks. For every processed model/drawing the status is indicated in three possible colours:
Status: OK; colour: green: the model/drawing passed the process without any error.
Status: warning; colour: yellow: while processing the model/drawing some problems occurred, which are reported in the next field ‘description’. These warning messages should be checked in the appropriate models.
Status: error; Colour: red: the process for the model/drawing failed. The reason for this is described in the ‘description’ field.